
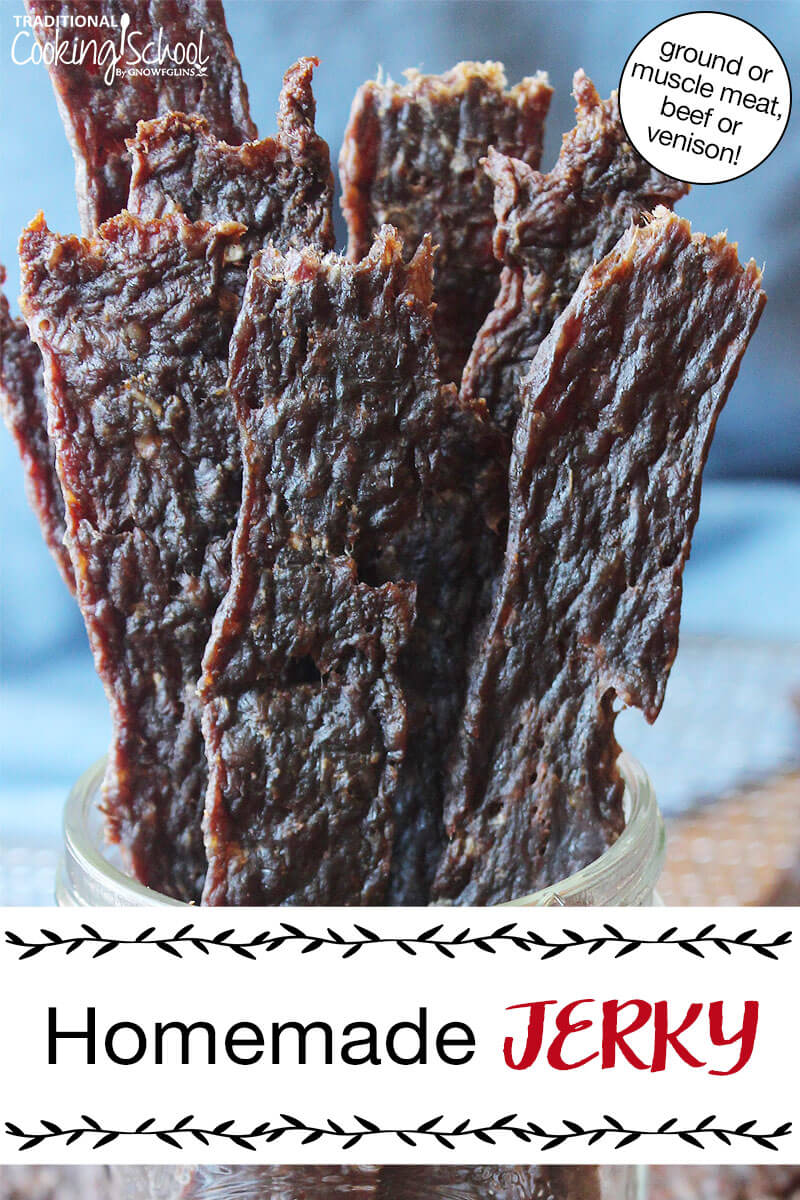
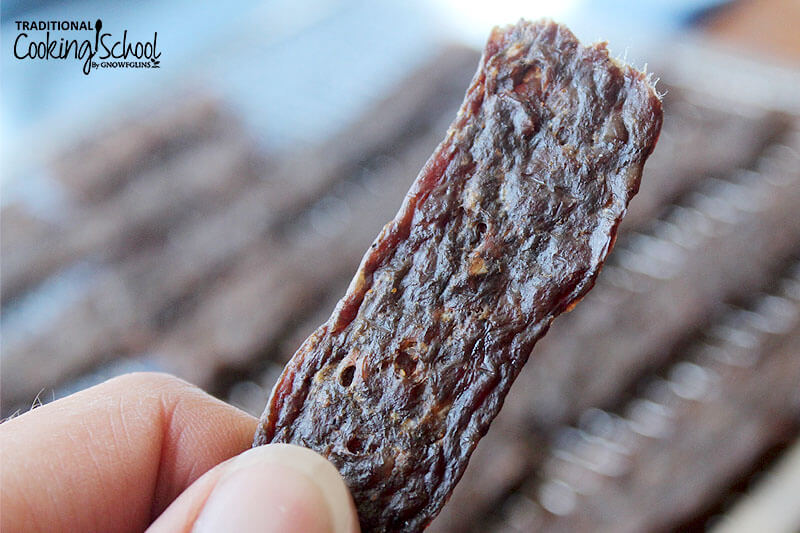
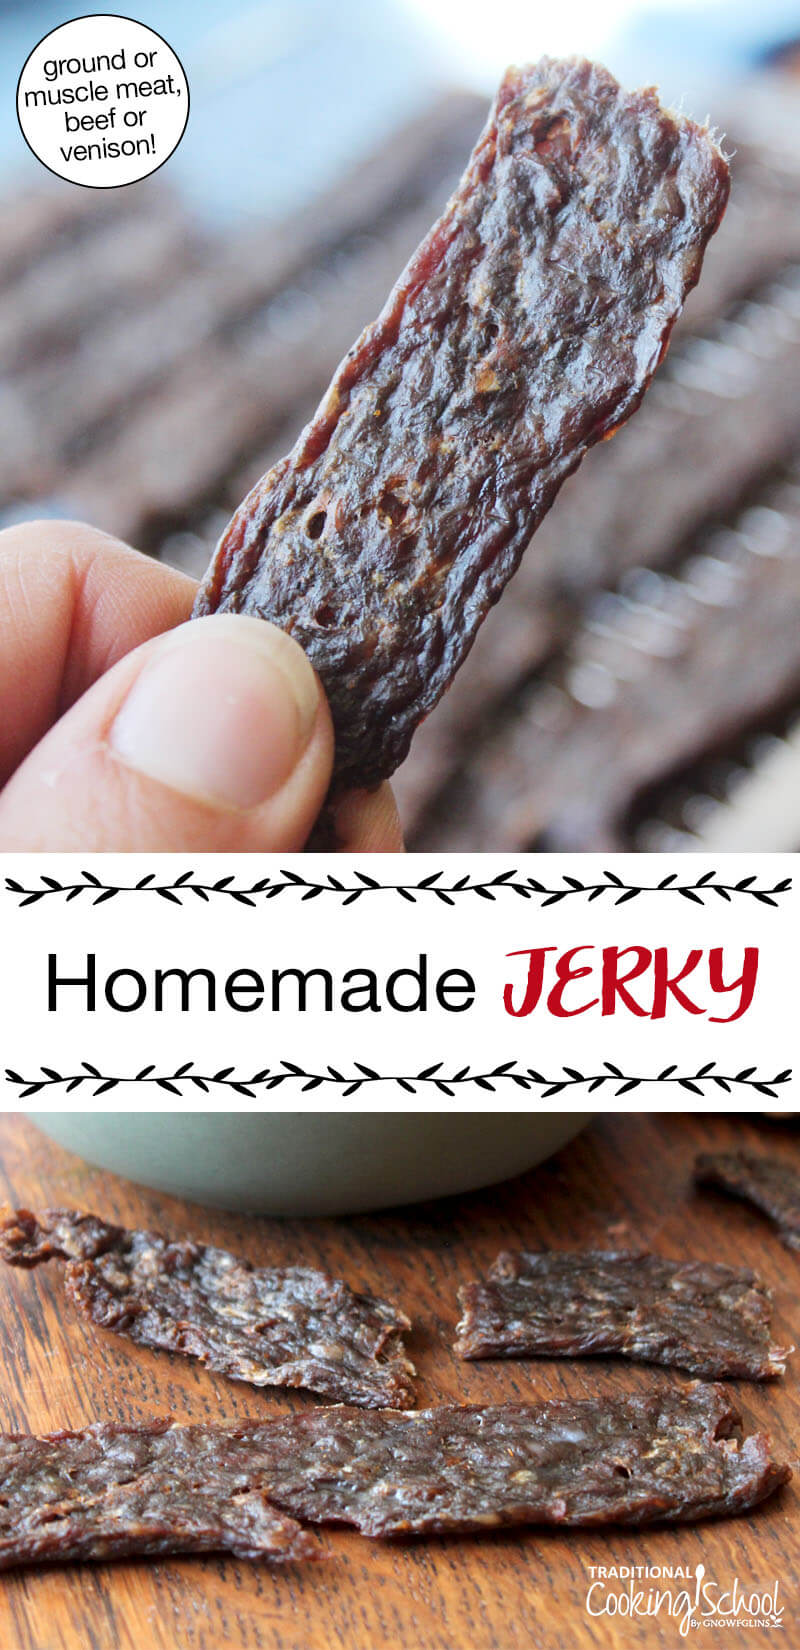
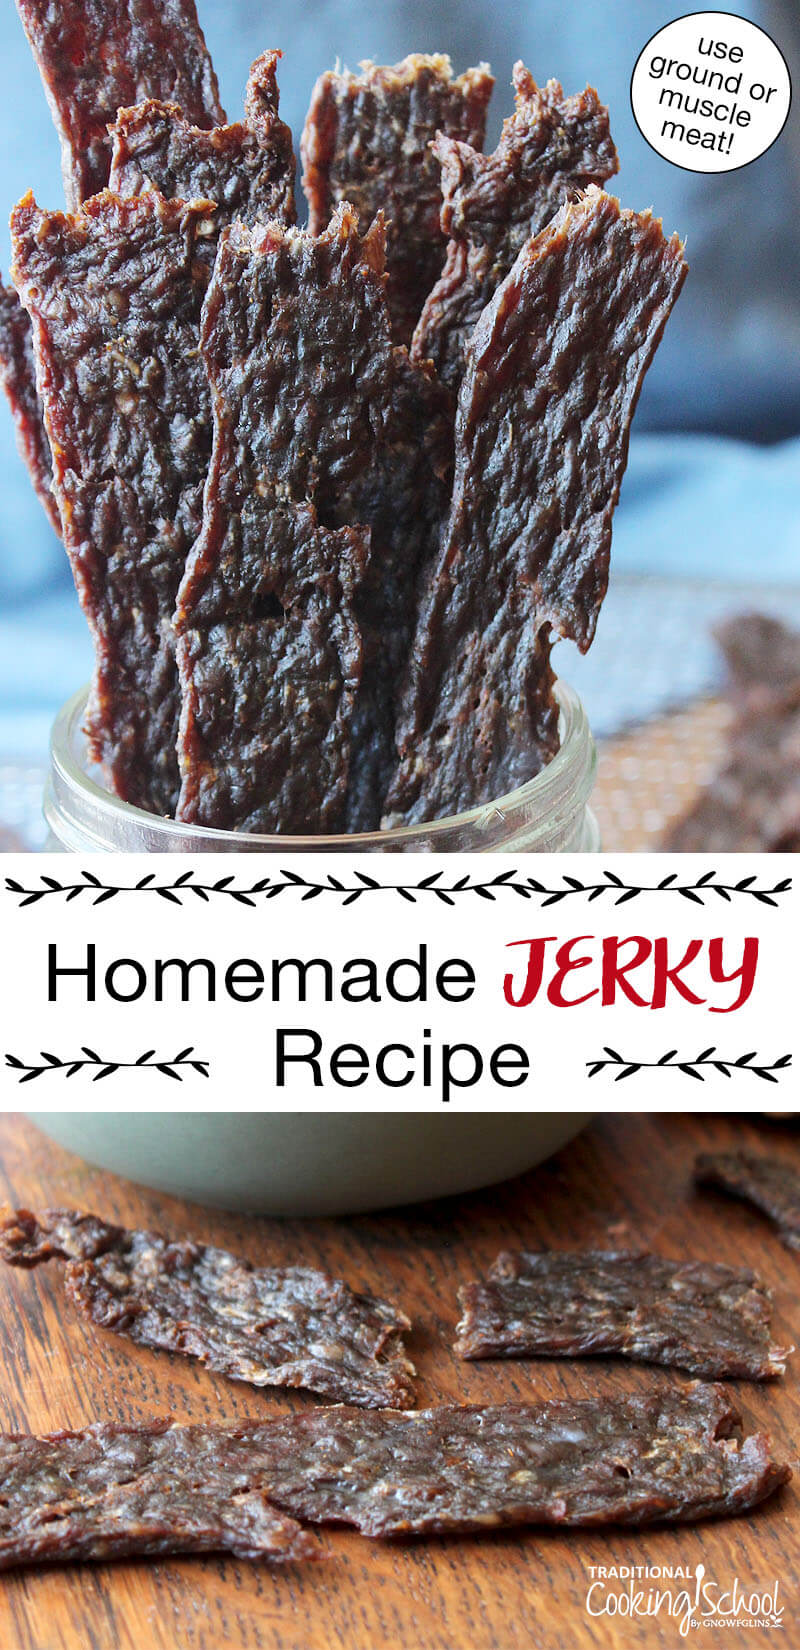
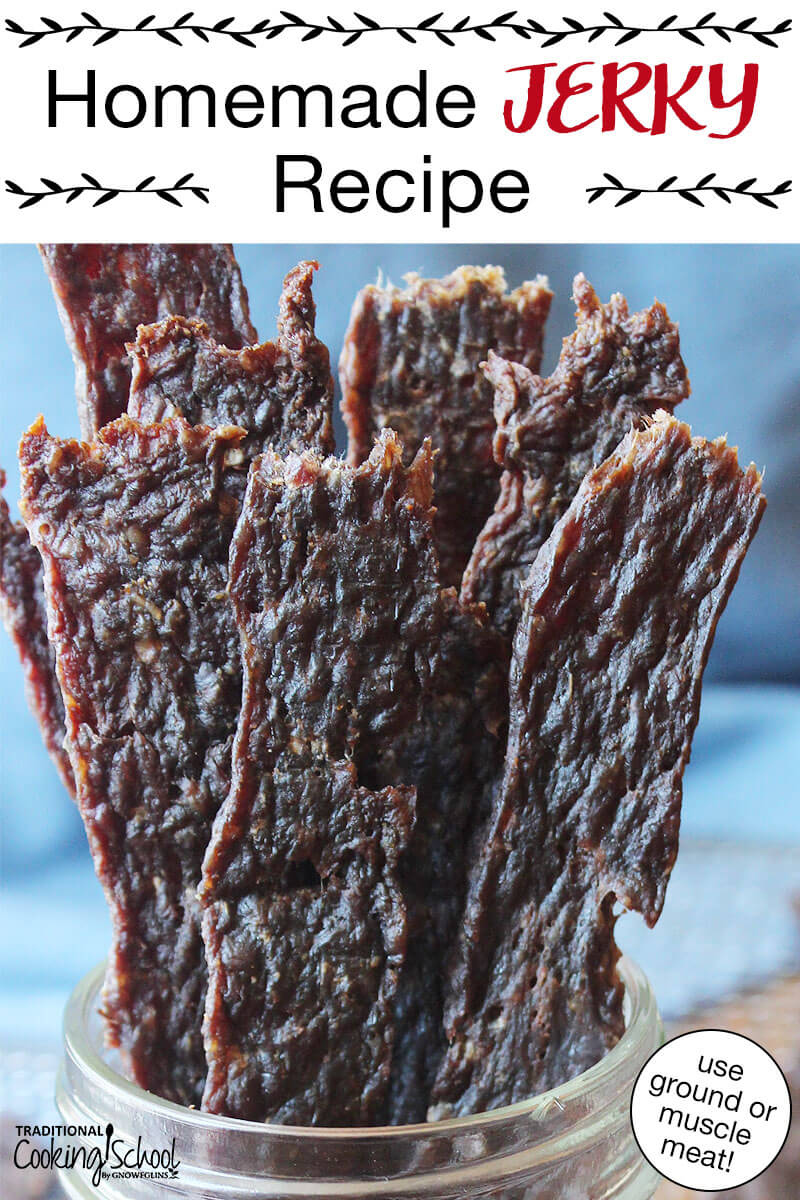
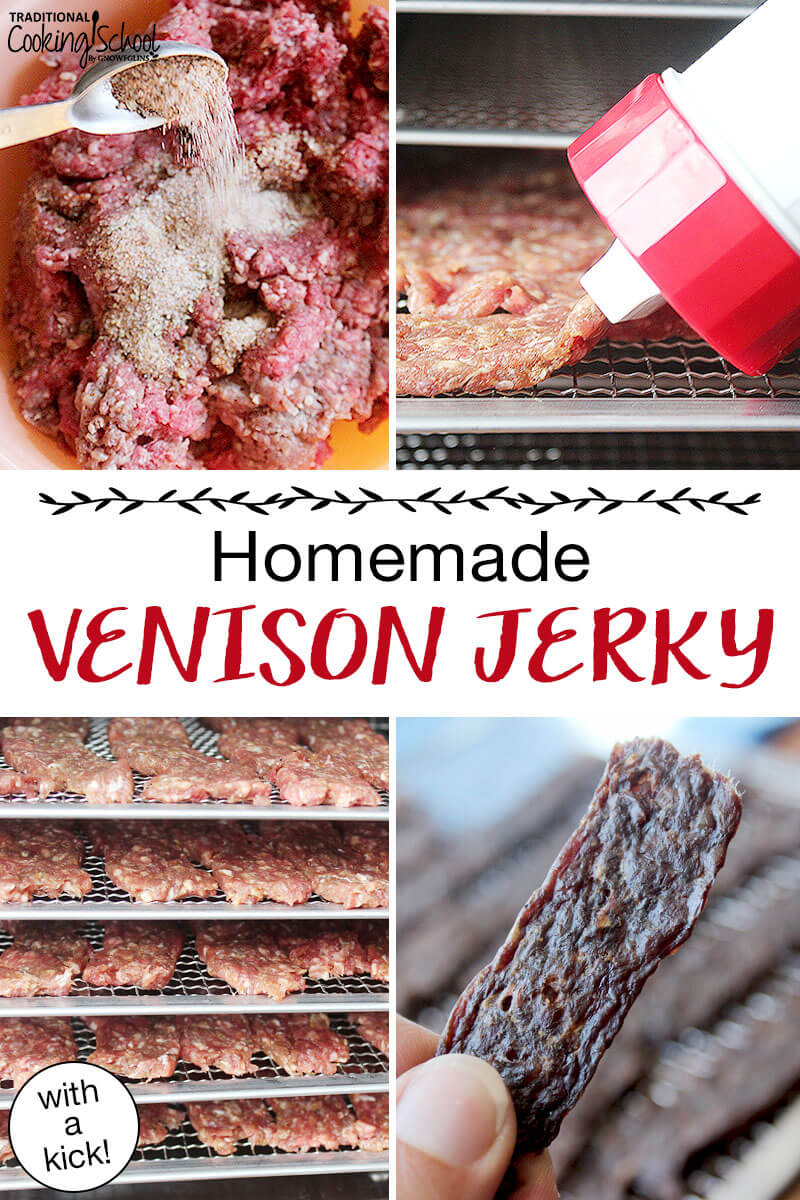
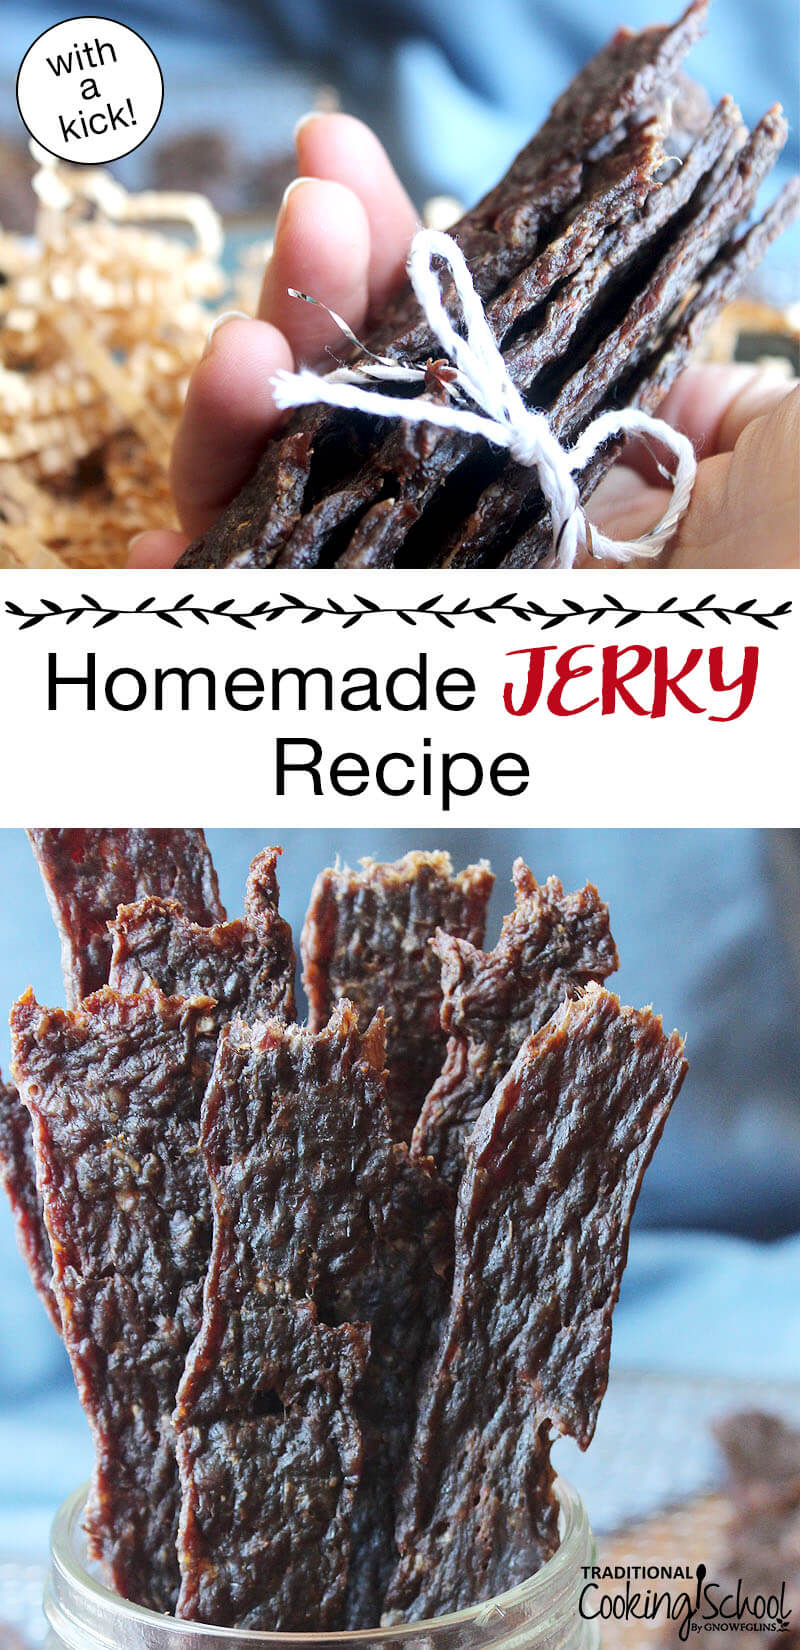
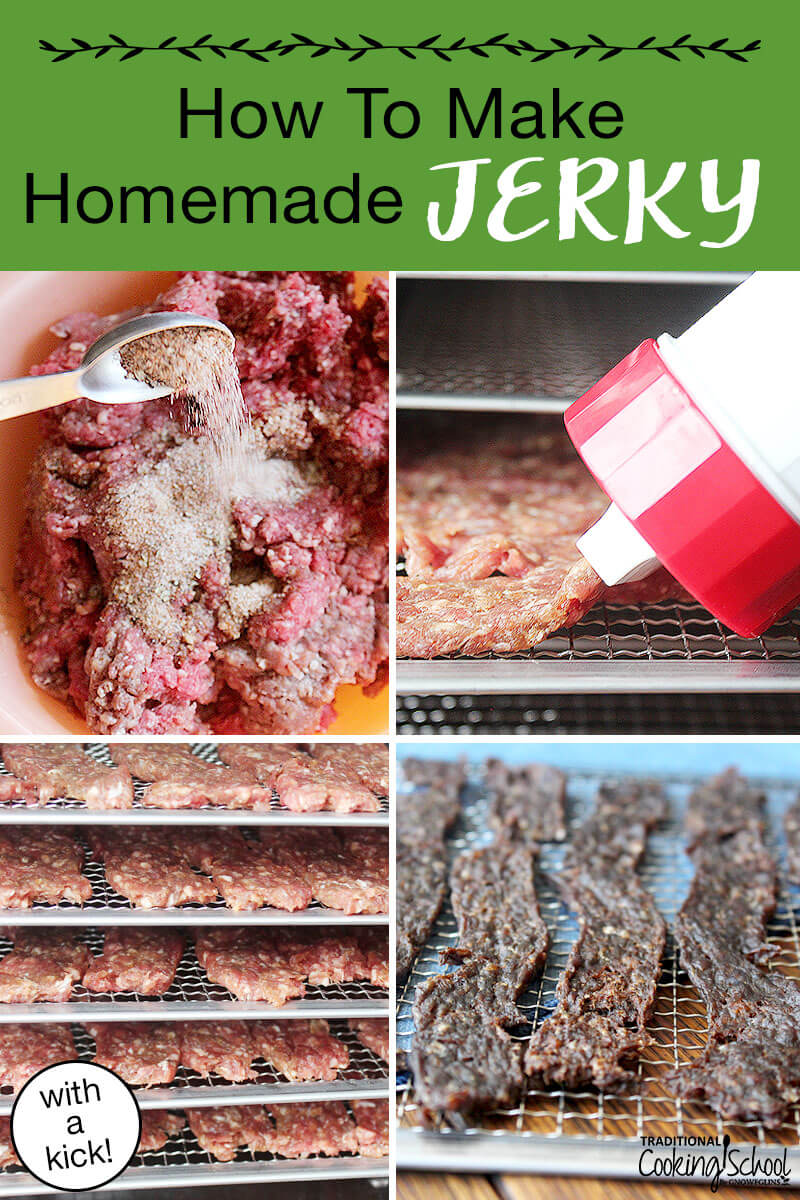
Packed with protein for the perfect snack, this homemade jerky won’t last long in your home! First gather your meat — whether ground or muscle, beef or venison — and marinade it with spices for an extra kick of flavor, then pop in the dehydrator. Enjoy!
Snacks can be addicting, can’t they? This is one snack I don’t mind our boys overloading on, with its high protein content and natural flavors.
Jerky-making week (yes, it is a process) is certainly not a dull period of time in our home full of boys. This is especially true if my husband harvests a deer and processes it to use in the jerky.
My husband is not one to be seen in the kitchen much, so jerky-making week is a joyful family affair. There are jobs for everyone, even the little ones.
My older boys enjoy mixing the spices and pressing the lever on the jerky gun. We all enjoy the wafting smells coming from the dehydrator, and of course, the taste-testing.
Jerky is such a beloved treat in our home that we literally have to freeze small batches immediately, or it will be gone in a matter of three days!
Table Of Contents
Why I Love This Recipe
Before I met my husband, I gave up on jerky. I had tried too many kinds (either store-bought or homemade) that were too tough, too chewy, or too plain-tasting.
Not to sound like Goldilocks, but I was just done with finding the perfect jerky.
So naturally, when my husband asked me to try his own jerky recipe made from venison, I was skeptical. Well, I’m here to tell you I’ve been sold on jerky ever since that first bite!
Over the years, we’ve tweaked the recipe and enjoyed it many times, whether using venison or beef as the base meat. You can swap out whatever meat you have on hand — venison, beef, pork, chicken, or a combination!
Ingredients
The ingredients for homemade jerky are simple:
- A marinade with sea salt, black pepper, cayenne pepper, ginger, marjoram, and garlic powder.
- Ground or muscle meat (I use beef or venison, but you can use pork or even chicken for this recipe too).
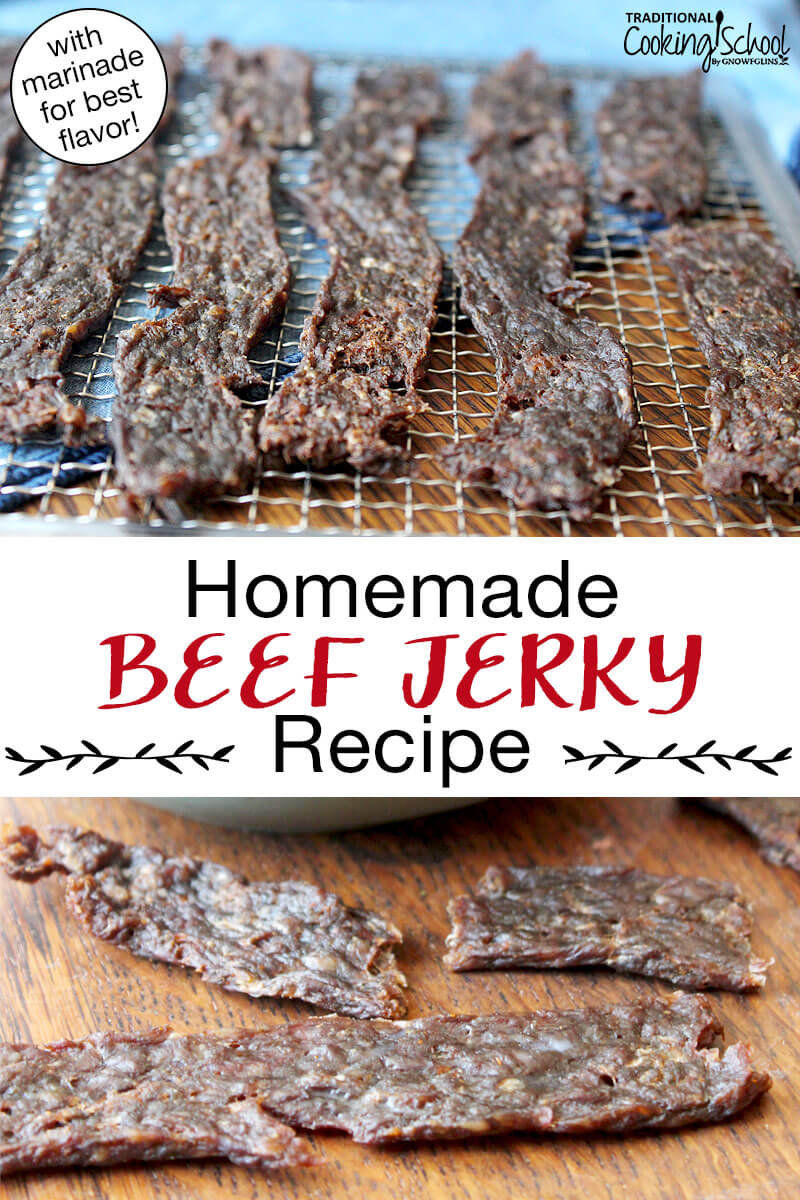
The spices are mixed with natural liquid smoke and then mixed with the meat and marinated for up to 24 hours. Be sure to choose natural liquid smoke without added colors, additives, or preservatives.
Supplies Needed
Whether you are using beef or venison, several supply items are needed:
- Dehydrator. Learn which dehydrator might be right for your family here!
- Sharp knife or jerky slicer (if using muscle meat).
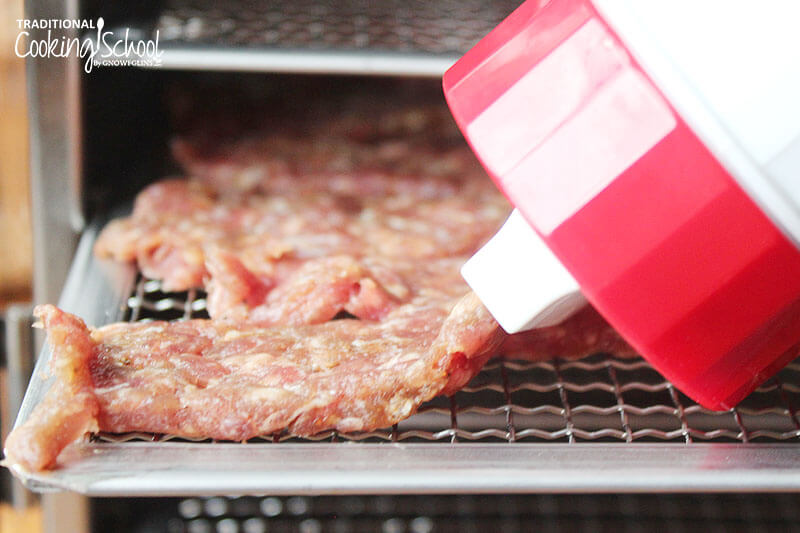
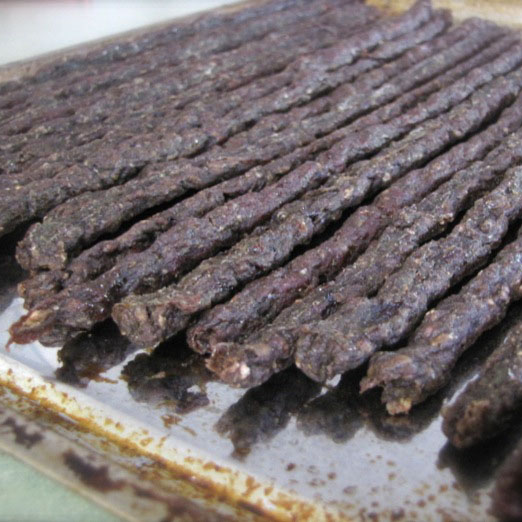
- Jerky gun (if using ground meat). Most jerky guns come with three attachments — use the attachment with one narrow, long opening.
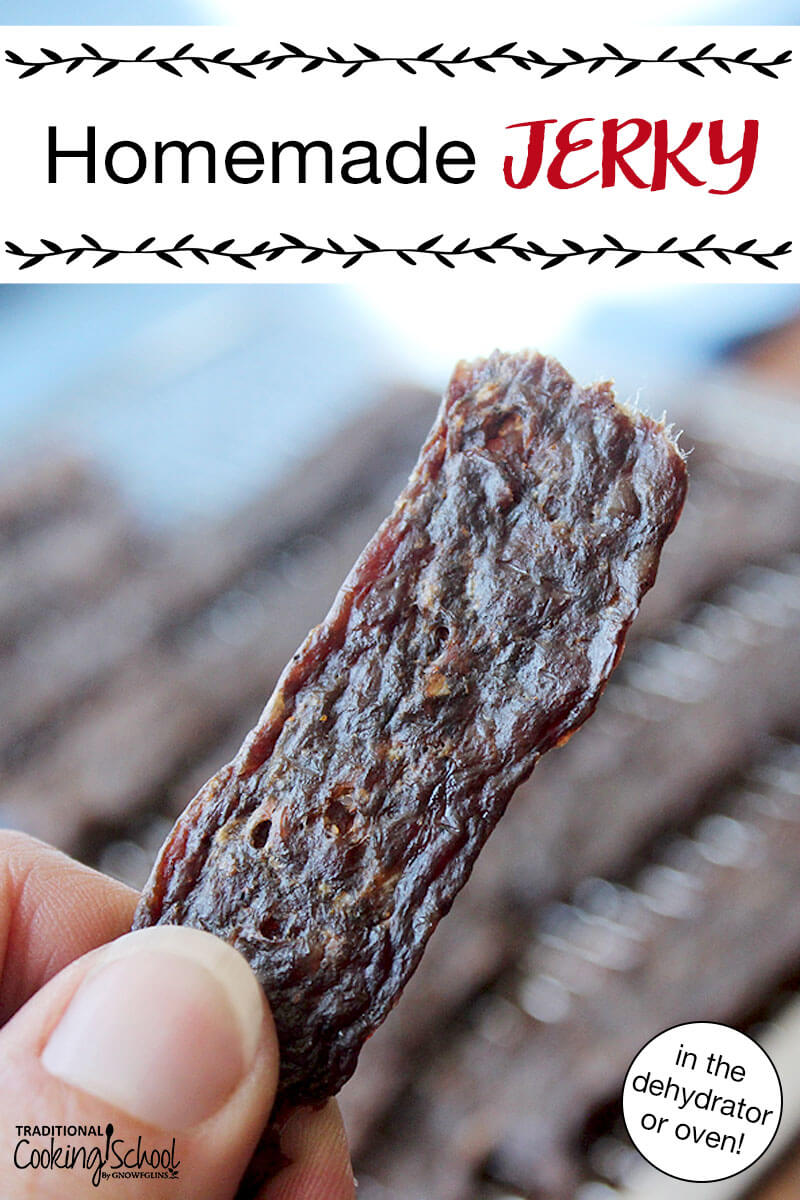
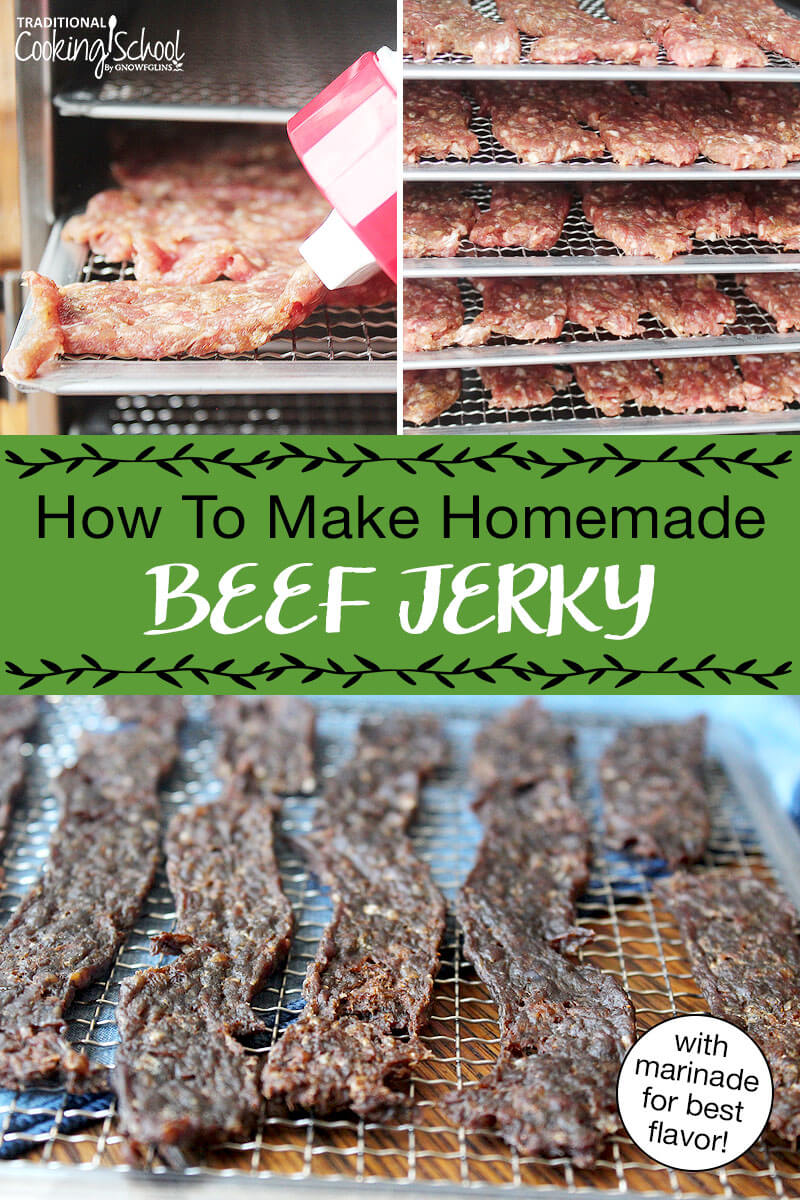
How To Make Homemade Jerky
Typically ground meat is used for this recipe. However, the past couple of years my husband has tried muscle jerky with the recipe, and the result is just as good, if not better.
This can be a painful trade-off as you have to use the portions of the animal typically used for steaks as your meat for jerky.
Ground Beef Jerky (Or Venison)
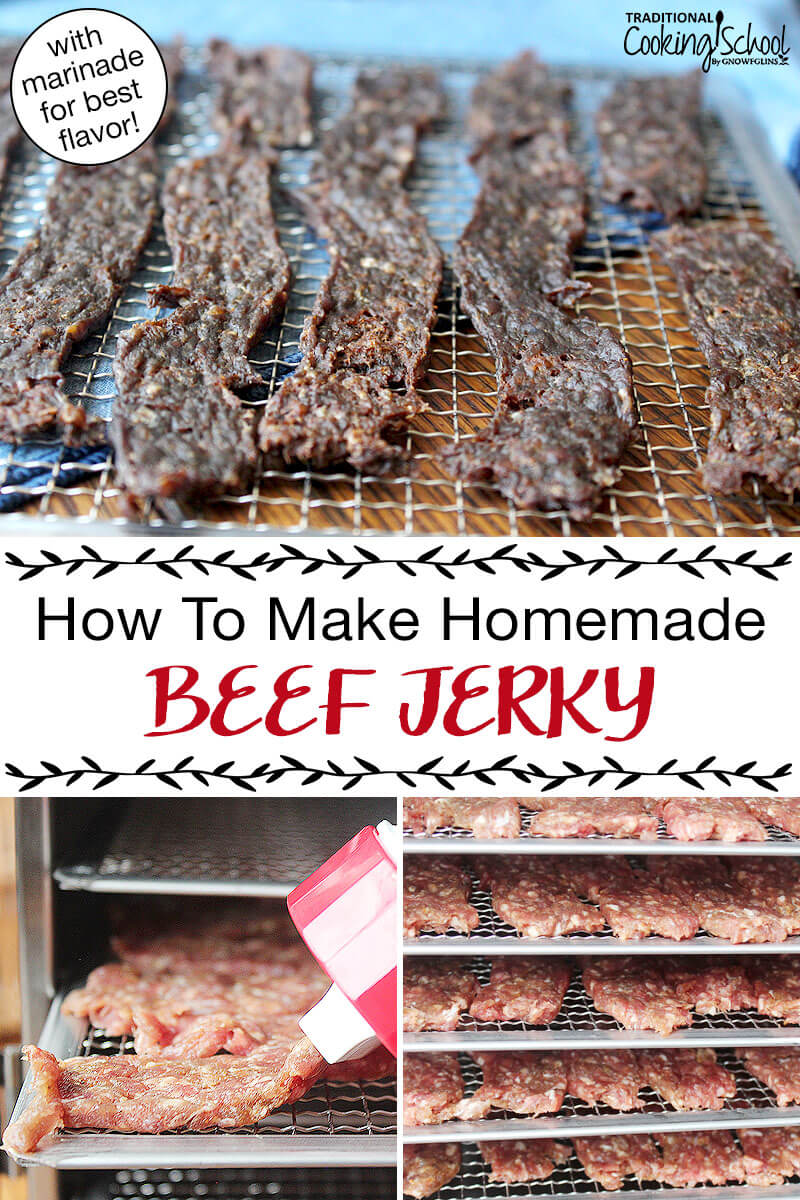
The process for ground meat jerky is much simpler than muscle meat jerky.
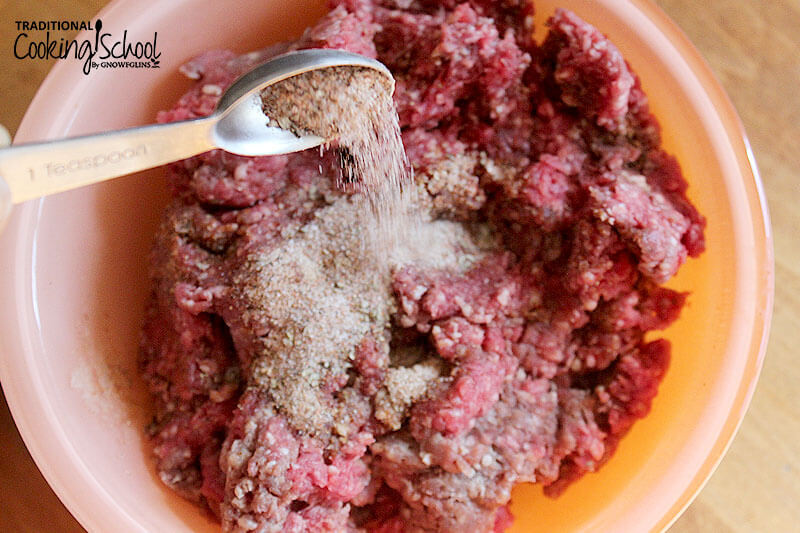
- Mix together spices and liquid smoke to make a marinade.
- Add to ground meat.
- Soak for 24 hours.
- Several times during the soaking period, remix the meat/marinade mixture (usually with your hands) to make sure the marinade is evenly distributed and the spices infuse well.
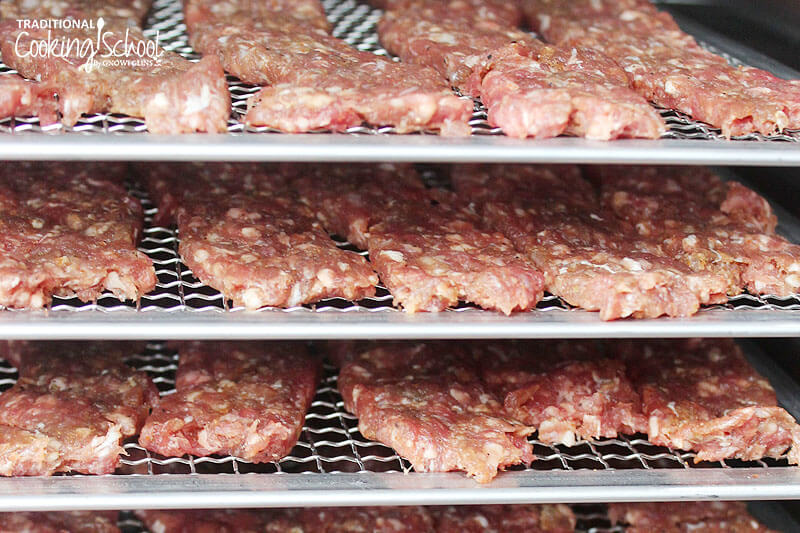
- Once marinating time is up, simply pack the jerky gun canister full of meat and fill dehydrator trays with single layer jerky strips. Parchment paper may be used for an easier clean up. It is better if the strips aren’t touching for optimal cooking and air circulation.
- Set dehydrating temperature to 150 degrees Fahrenheit. The jerky will take 5 to 9 hours, depending on the brand and quality of the dehydrator.
- Towards the end of the cooking time, you may choose to check the jerky every 30 minutes so it doesn’t dry out.
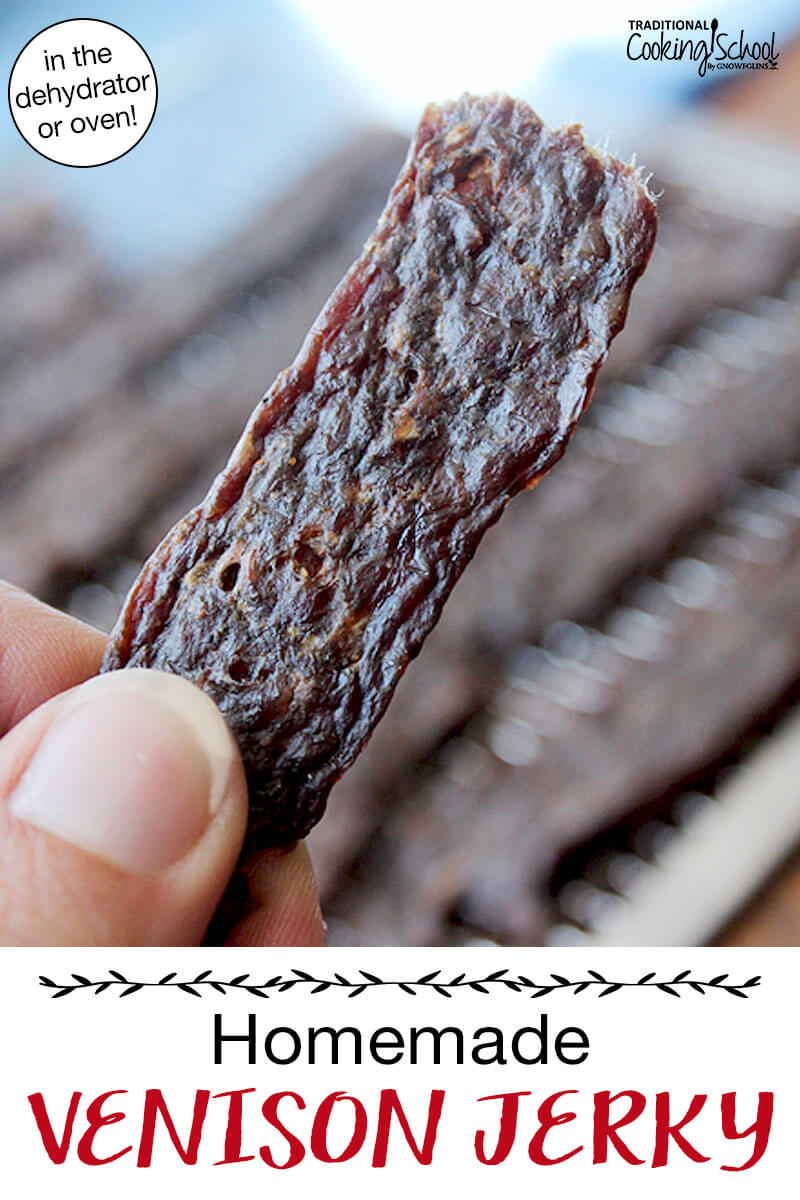
- Taste test until you’re happy with it! Look for no pink in the meat, and a good crisp chew to the texture, but not too chewy, like it might be undone. Some meats are fattier, and using a paper towel to blot the fat off may be useful.
- Store jerky in an airtight container or freeze.
Looking for more ways to use ground meat? Check out 25+ Healthy Ground Beef Recipes for Easy Meals.
Muscle Meat Jerky
The easiest way to make muscle meat jerky (after you’ve processed the cow or deer) is to use a jerky slicer.
The best portions of meat for muscle jerky, according to my husband, are the hindquarters and front shoulders. The back straps and the tenderloins are of course off-limits. 😉
We turn all other portions of the deer into ground venison, and then jerky, as well.
- Thinly slice the meat about one inch thick (depending on the brand of your slicer) and feed it through.
- If you don’t have a jerky slicer, you can simply cut the meat by hand.
- After the slices are cut, mix the meat with the marinade.
- Soak for 24 hours.
- Once marinating time is up, drain the marinade if necessary from the meat.
- Place pieces of meat on dehydrator trays.
- Set dehydrating temperature to 150 degrees Fahrenheit. The jerky will take 5 to 9 hours, depending on the brand and quality of the dehydrator.
- Towards the end of the cooking time, you may choose to check the jerky every 30 minutes so it doesn’t dry out.
- Taste test until you’re happy with it! Look for no pink in the meat, and a good crisp chew to the texture, but not too chewy, like it might be undone. Some meats are fattier, and using a paper towel to blot the fat off may be useful.
- Store jerky in an airtight container or freeze.
Don’t Have A Dehydrator?
If you don’t have a dehydrator, you can use the oven instead.
- Follow the directions above, yet lay out strips of meat on baking trays.
- Set oven to 150 degrees Fahrenheit, or as low as your oven will go (propping the door open with a wooden spoon if necessary).
- Turn the tray multiple times until jerky is dry, with no pink in the middle and desired texture.
More Dehydrator Recipes
- Homemade Sourdough Croutons In The Dehydrator
- How to Dehydrate Apples
- Soaked Granola Recipe (raw & enzyme-rich!)
- Soaking Nuts & Seeds (+How To Dehydrate Them, Too!)
- Cocoa Almond Crumbles
Did you make this homemade jerky recipe? What spices did you use? Please leave us a rating or comment below! We’d love to hear from you!
Homemade Jerky
Packed with protein for the perfect snack, this homemade jerky won't last long in your home! First gather your meat -- whether ground or muscle, beef or venison -- and marinade it with spices for an extra kick of flavor, then pop in the dehydrator. Enjoy!
Ingredients
- 2-1/2 pounds meat
- 5 teaspoons sea salt
- 1 teaspoon ground black pepper
- 1-1/2 teaspoons ground cayenne pepper
- 1/4 teaspoon ground ginger
- 1/2 teaspoon dried marjoram
- 1 teaspoon garlic powder
- 5 teaspoons natural liquid smoke
Instructions
-
If using muscle meat, prepare by slicing into smaller pieces. If using ground meat, proceed with recipe.
-
Mix all spices and salt together in a small bowl.
-
Add the liquid smoke to combine.
-
Place your meat in an extra large mixing bowl.
-
Slowly pour the marinade mixture over the meat.
-
Mix thoroughly by hand. This will ensure the spices are evenly disturbed.
-
Cover and place in fridge for 24 hours.
-
At least once during that time period take the marinate meat mixture out of the refrigerator and mix well by hand in a kneading motion. This step is especially important if you are using ground meat.
-
After the 24 hours is up, it’s time to make the jerky.
Ground Meat Jerky
-
Simply pack the jerky gun canister full of meat and fill dehydrator trays with single layer jerky strips. Parchment paper may be used for an easier clean up. It is better if the strips aren’t touching for optimal cooking and air circulation.
Muscle Meat Jerky
-
If you are using muscle meat, drain the marinade if necessary from the meat. Place pieces of meat on dehydrator trays.
Dehydrating
-
Set dehydrating temperature to 150 degrees Fahrenheit. The jerky will take 5 to 9 hours, depending on the brand and quality of the dehydrator.
-
Towards the end of the cooking time, you may choose to check the jerky every 30 minutes so it doesn’t dry out.
-
Taste test until you're happy with it! Look for no pink in the meat, and a good crisp chew to the texture, but not too chewy, like it might be undone. Some meats are fattier, and using a paper towel to blot the fat off may be useful.
-
Store jerky in an airtight container or freeze.
Recipe Notes
2-1/2 pounds of meat dehydrates down to about 12 ounces.
Don't Have A Dehydrator?
If you don't have a dehydrator, you can use the oven instead.
- Follow the directions above, yet lay out strips of meat on baking trays.
- Set oven to 150 degrees Fahrenheit, or as low as your oven will go (propping the door open with a wooden spoon if necessary).
- Turn the tray multiple times until jerky is dry, with no pink in the middle and desired texture.
Here is Wardee’s homemade jerky recipe made with ground meat. She adds nutrient-dense grass-fed beef liver to her recipe… yet you can’t even taste it!
Tender Ground Meat Jerky
Ingredients
- 3 pounds grass-fed ground beef or venison, or lamb, or buffalo...
- 1/4 pound ground liver optional
- 2 teaspoons sea salt use 2 tablespoons for longer-term keeping
- 1/4 teaspoon ground black pepper
- 2 teaspoons garlic powder or granulated garlic
- 2 teaspoons ground cumin or more!
- pinch ground cayenne pepper
Instructions
-
Blend all the ingredients together in a big bowl. Use clean hands.
-
Taking a portion at a time, press the meat mixture into about 1/8 inch thickness on a piece of natural parchment paper that is the same size as your dehydrator tray. Or use the ParaFlexx sheets that go with an Excalibur dehydrator.
-
You could also use a rolling pin to spread it out, but I find I can never get the thickness consistent, so I prefer to take extra time and press the balls out into a sheet myself.
-
When a sheet is full, square up the edges to your liking, using your fingers.
-
Then use a butter knife to score the meat into jerky-size pieces. Don’t use a sharp knife or you’ll cut through parchment paper or Paraflexx sheets!
-
Transfer the whole shebang to a dehydrator tray and put the tray in/on your dehydrator.
-
Repeat until you’ve spread out all your meat mixture.
-
This recipe fills 4 to 5 trays of my 9-tray Excalibur dehydrator, depending on the thickness I achieve.
-
Or use a jerky gun to make sticks!
-
Set the dehydrator’s temperature to 145 or 150 degrees Fahrenheit.
-
Depending on thickness, expect total drying time to be 12 to 18 hours.
-
Flip over mid-way, which is usually when the jerky is curling up from the bottom and not sticking to the tray’s liner any more.
-
You have to play with how much it “cooks” — and keep in mind that coming out of the dehydrator it is going to be much softer than it will be when it cools. I look for no more pink and try to get it out of the dehydrator while it is still really soft. It always surprises me how much it hardens up once it is out.
-
Tear apart the pieces and put them in a bowl or tray to cool fully.
-
Then store in a cool, dark place in an airtight container. Or in the refrigerator if not using up within 2 weeks.
Recipe Notes
Don't Have A Dehydrator?
If you don't have a dehydrator, you can use the oven instead.
- Follow the directions above, yet lay out strips of meat on baking trays.
- Set oven to 150 degrees Fahrenheit, or as low as your oven will go (propping the door open with a wooden spoon if necessary).
- Turn the tray multiple times until jerky is dry, with no pink in the middle and desired texture.
This post was originally published and written by Wardee Harmon on 2010/1/20. It was updated and republished on 11/30/20.
...without giving up the foods you love or spending all day in the kitchen!

2 free books:
Eat God's Way
Ditch the Standard American Diet, get healthier & happier, and save money on groceries...
We only recommend products and services we wholeheartedly endorse. This post may contain special links through which we earn a small commission if you make a purchase (though your price is the same).


Wow, Wardee, this sounds like something I could do! My boys sampled some beef jerky at our local farmers’ market and really liked it. Thanks so much for this simple, useful idea! I had never considered using ground meat for jerky. *smacks forehead*
Sorry to comment here. Confused about page design. Was wondering if all dehydrators have sufficient heat? I have a plastic model from a yard sale, should I try using it? I have used it for fruits many times but never thought about what the temp in it might be.
YES CHILL THE PLASTIC DEHYDRATORS WORK GOOD. I USE ONE MYSELF–I THINK ITS CALLED SOMETHING HARVESTOR. IF I DON’T HAVE ANY GROUND DEER ON HAND, I’D GO YOU’RE LOCAL MEAT MARKET AND IF THEY WILL GET THEM TO SLICE SOME CHEAP ROUND ROAST OR ANY LEAN MEAT UP TO 1/8th” THICK . I’D TRY 3-4#’S IN ONE BATCH.
FIND A GOOD JERKY SEASONING FIRST AT LOCAL STORES IF YOU CAN FIND IT OR ORDER ONLINE FROM A GOOD MEAT PROCESSING COMPANY THAT SELLS GRINDERS AND ACESSORIES LIKE THAT. IT TAKES ABOUT 4 HRS. NORMALLY AND I TURN OVER EACH TRAY ABOUT EVERY HOUR AND EVEN CHANGE THE TRAYS AROUND TO DIFFERENT POSITIONS. SOME DEHYDRATORS HAVE TEMP. CONTROLS, BUT IF YOU’RE’S IS LIKE MINE, IT’S JUST A ON-OFF SWITCH.
CHILL- CHECK AFTER ABOUT 3 HRS. OF DRYING AND IF IT CRACKS A LITTLE WHEN BENDING A PIECE AND TASTES GOOD YOU’RE GOOD TO GO–RANDY
I have tried jerkey a couple of times and it always flops. I have never considered using ground meat, either. When you use meat that isn’t ground you have to slice it uniformly or it doesn’t dry well. I didn’t do so hot in that area.
My birthday is next week and I’ve been waiting for my mom to ask what I want so I can tell her to get the Excalibur food dehydrator. I think she’s just going to give me money, though, which will have to go into the checking account to pay for school. Ugh. (Isn’t that selfish of me?? Ha.)
The trick to slicing meat thinly & uniformly is to have it partially frozen – too cold and it’s impossible to cut, too thawed and it doesn’t shave well.
We make jerky with ground venison, and use a jerky gun to have it all the same thickness in the dehydrator. I have an Excalibur, too, and just place the raw jerky on the trays without anything underneath. Venison is lean enough that we don’t worry about any grease dripping.
Someone just gave me the link to your blog, and I really am enjoying it!
Thank you for the recipe, Wardee! I will definately be trying this one. I like worcestershire sauce, and found a pretty clean brand from Azure, so I’d probrably add some. I think I’ll try to ask for an Excalibur for my birthday and see what happens!
Worcester Sauce (pronounced WOOSTERshire) is fermented anchovy sauce that originated in the BRITISH INDIAN RAJ. The genuine, and still the best, is LEA & PERRINS is still made to an original (and secret) recipe. All else are, to the afficiando, inferior copies!! It is an essential ingredient of a BLOODY MARY cocktail and no substitutes are allowed!!
Kimber – I did the same head smacking! 😉
Amy – You’re so selfish. 😉 I hope someday you’ll get that dehydrator, even if you have to wait until school is over. BTW, what are you going to study?
Lynn – Yumm! What do you use for spices? I have not heard of a jerky gun, but am going to google it now. This jerky – with the beef – is very drippy. But I’m glad you pointed out that if you’re using lean meat, that the liner isn’t necessary. Thanks!
Kelli – When is your birthday? How much time have we got? 😉 What Worcestershire brand did you buy? I haven’t been ordering from Azure regularly, nor do I hit any of the health food sections in Roseburg very often, so I haven’t been able to look for a good one yet.
Can’t wait to try this one! My kids will love it!
Last year I made some jerky using a recipe where you soak the meat in seasoned kefir before dehydrating. It was fantastic! It was from a WAPF chapter in Texas with pdf recipes on their website.. sorry, i can’t remember any more than that.
I might try this with the ground meat. I can imagine it being really tasty! And so much less expensive than good commercial beef jerky.
Thanks for posting this recipe Wardee. I have been wanting to try making jerky, but it always seemed like too much work. This is something that I think I could manage and it sounds delicious.
Great idea to use the jerky as pepperoni on your pizza! Yet another reason to add to my list of why I want an Excaliber! 🙂
Alyss – If you ever do find that recipe, you know where to find me!
Shannon – It is really easy, you’ll like it.
Sonya – I can help you find more reasons if you’d like.
Tiffany – Enjoy!
This is a do-able recipe! Thanks so much!
Oh! I KNEW there was a reason I got the ParaFlexx sheets as my freebie gift with my Excalibur! 🙂
I’m going right out to the freezer to take out some ground beef. Jerky will be made this weekend!
Wardee, am very glad you posted a good recipe for jerky, because I was having trouble finding one. So many of them require Tender Quick, and I don’t want to use that. We used a recipe 2 years ago that was way too salty for us, and even our dog wouldn’t eat it! Your post prompted us to take out our venison to get started tomorrow. Thanks! Hope you found something to tell you about jerky guns, they really save time. Mine came from American Harvest/Nesco, and are available at places such as Wal-Mart.
I use a cookie press instead if a jerkey gun! Works great with the right shape–kind of looks like a horizontal line with wiggly top and bottom. Simple!
The other great thing about using ground beef is that it’s so much cheaper than other cuts of meat! Great post once again, Wardee!
.-= Kimi @ The Nourishing Gourmet´s last blog post… Good Seafood Choices: Low in Mercury, High in Nutrients and Environmentally Friendly =-.
So I tried this and totally killed the jerky. Left it in the dehydrator overnight and it turned out more like crackers- so thin and crispy. Do you think I could re-hydrate it with a mist of water or should I just leave well enough alone?
Sara – uh-oh! I don’t know… that is worth a try. Try it on one piece and see what happens – see if you like it or not. So sorry!
I’m pretty new to jerky, but could you maybe throw it into a pot of broth with a bunch of veggies and turn it into burger stew or something?
When this happens to me, and it does because I am forgetful…. We just break off small pieces and ‘rehydrate’ them in our mouth! Very tasty and slows down the munching. It is easy to scarf down a whole lot of meat in a short time with jerky and we find portion control easier this way. It is also a nice way to eat jerky while hiking, kind of like chewing gum, only not.
I have read that one could put a piece of bread into a storage bag of over-dried jerky to help restore some moisture back into jerky. The premise is that what little moisture that is in the bread would be absorbed into the jerky. The bread increases the moisture environment within the confines of the closed storage bag/container. With that said, please be mindful and observant of potential mold development on the bread or jerky due to the moisture from the bread. Only keep the bread in the jerky long enough to achieve the desired pliability of your jerky.
Lynn and Michelle – Guess what? I got a jerky gun today!!!! Can’t wait to try it. 🙂
I am so glad you posted this! I hope it’s yet another nutritious thing my 5 yr old daugther will eat! If it truely isn’t too tough, I will bet she would like it.
Do you think it would be possible to mix some ground liver in with the burger? And get away with it? 🙂 I’ve learned I need to get lots of liver into her diet after listening to Rami Nagel (Cure Tooth Decay) on cheeseslaves podcast and talking with him through email. I have some grass fed beef liver in the freezer now that I was just trying to figure out how to get into our diet. And unfortunately I am out of grass fed burger but my husband hit a deer on the way to work this morning, so guess what is hanging in our garage? 🙂
Thanks!
Tammy
Tammy, I think that’s a great idea! Be sure to let me know how it goes. What a blessing to have a deer in the garage.
Is your baby girl low on Iron? I read a nutrition list once and it showed that Turkey is higher in Iron than Beef liver.
We looove beef jerky at hour house, never thought of making it ourselves, let alone from ground beef! I don’t yet have a dehydrator- so I have mine in the oven on the lowest temp it will go. Can you help me justify a dehydrator? What would I use it for?
Well, Wardee, I have jerky in my dehydrator! I tried using a pastry bag with the biggest round tip I had, but after 5-6 lines of meat, I poked a hole in the bag with my finger, and the meat squirted out the side! Oops…
Anyway, I can’t seem to convince myself to follow any recipe exactly, so I tinkered just a little. I used fresh garlic (7-8 cloves that I grated on a Microplane zester), and added about 3-4 T. of soy sauce, and pressed the meat onto parchment paper. To square off the edges I used my pastry scraper (it worked great!), and then someone in my brain suggested that the pastry scraper would work great for scoring the meat, too. Worked like a charm!
I’ve tasted some from the lines that I piped out, as it dried faster with more surface area. It was really good. My two oldest boys each tried a piece while they were eating breakfast. They raved about it, and are already giving me tips of just how it would be the best on some pizza. 🙂
Kimber – That’s great! I love how you made this work for you. Great tips that I think will help others, too. 🙂
I am doing this today….I have this in the dehydrator right now! I cannot wait to try it. It is looking pretty good. I am almost to the half-way/turn it over point. It smells wonderful!
SueEllen – I’m so excited you’re trying this! Yumm! I just finished a batch yesterday.
I’m curious, what percentage of fat is the meat you used?
I’m excited to try this, but it seems like it wouldn’t keep more than a few days if the meat is more than, say 5% fat, seeing as fatty (with the grain) jerky spoils quickly and is a bit pointless.
Nonetheless, I’m sure this will work wonderfully as long as I use lean meat, thanks!
P.S. I’ve read accounts of people dipping jerky in melted fat when eating it, seems sensible enough, and would probably taste better than gnawing on plain jerky and getting just protein without all that lovely fat.. like deconstructed pemmican!
Luna – I’m sorry I’m just answering this now. I sat down to answer comments last night, intending to start with yours (as it was the oldest at the time) but somehow I missed it inspite of my intentions.
I do not know what percentage of fat my meat is. However, it is probably on the lean side, as the grass-fed cows we buy are not heavily fatted and the butcher doesn’t add additional trimmings into the ground beef. But it isn’t too lean because fat drips out on the trays of the dehydrator when I make this jerky – and when I brown the beef on the stovetop (at other times) there’s plenty of fat to keep the meat moist and tasty.
In one jerky recipe I read that you should store the jerky in the refrigerator. I have not done this yet. My jerky batches last for not longer than two weeks and I haven’t had any spoiling in a dark kitchen cupboard. Granted, it is winter and the house is never warmer than 70 degrees.
I want to try pemmican! This is great jerky – very satisfying and delicious and not hard on the jaw.
Just tried with 50/50 ground beef and ground liver. Should have looked closer in the freezer to realize I DID have more ground beef and I could have lessened the liver proportion! I added tomato paste, salt and pepper, cumin and some curry to try to cut the liver taste. Ugh, tastes a good bit like dog food, but I’m hoping my toddler will eat most of it for us 😀
I like the texture though and will definitely make this again with less liver. Maybe 25% would be ok for us.
I do not have a dehydrator but would love to try this jerky recipe! Can I use my oven to dry this? And can you give me an idea on temp and time for the oven? Just found you and I am so excited to read more!
Kim, I would use the lowest temp on your oven, and just watch it. When it looks pretty dry on the top side and is loosening up from the bottom of the trays, flip over the strips. I’m sorry I can’t say how long this will be.
WARDEE– I HAVE DRIED A LOT OF DEER AND SLICED BOTTOM ROUND ROAST SLICED FREE AT THE MARKET STORE-QUALITY FOODS. THE DEER IS GROUND AND USED IN A JERKY CANNON IN ROUND ATTACHMENT LIKE SLIM JIMS OR THE FLAT ONE INCH WIDE ATTACHMENT FOR FLAT LAYING JERKY.
I SET THE OVEN ON 200 DEGREES AND LOAD THE JERKY TRAYS OR COOKIE TRAYS AND CRACK THE OVEN DOOR TO THE FIRST CATCH OF THE OVEN DOOR AND COOK APROX. 1 1/2 HOURS AND TURN OVER AND ROTATE TRAYS IF THEY’RE STACKED ON TOP OF EACH OTHER.
I BUY A LOT OF THE HY-MOUNTAIN JERKY SEASONINGS AND EACH PACKAGE WILL DO ABOUT 5# OF MEAT -GROUND OR SLICED ABOUT 1/8″ THICK. GROUND ROUND OR CHUCK GROUND BEEF HAS LESS FAT AND IS BEST TO MAKE THE GROUND JERKY-LESS DRIPPINGS
MY NESCO HARVESTOR TAKES ABOUT 5 HOURS TO BE ABOUT RIGHT AFTER TURNING OVER AND ROTATING TRAYS ABOUT EVERY COUPLE HOURS. WHEN YOU BEND THE SLICED JERKY AND IT CRACKS, BUT STILL FLEXIBLE AND TASTES GOOD YOU’RE GOOD TO GO!! SPREAD THE JERKY OUT ON PAPER TOWELS LAYERING WITH MORE PAPER TOWELS ON A FLAT COOKIE SHEET PAN .
YOU CAN FREEZE THIS IN PORTIONS FOR YOU’RE FAMILY AND PUT A PAPER TOWEL IN EACH BAG TO KEEP OUT ANY MOISTURE. ENJOY YOU’RE BOUNTY…
Thank you for the quick response. I will definitely be back often!
I tried this today in my oven set on warm (just under 200). It was done in a similar time to your dehydrator, but it smells the slightest bit like rotten meat and I’m afraid to taste it. Any ideas why yours doesn’t get rotten?
Keep in mind that most ovens work by turning themselves on and off periodically. Hence, you get temperature fluctuations. This is bad because you want the meat to be at 140degrees or more to inhibit bacteria growth.
The oven might be going up and down from 100 to 200 which overcooks the meat and has periods where bacteria can grow, or both.
———–
My biggest problem so far is figuring out how long to cook it. I want to make sure it is very well done so I am not eating raw meat. But my last few batches have been too hard.
I am gonna try less cooking and maybe toss in some pineapple juice which should work as a tenderizer.
TURN OVEN ON TO 200 DEGREES AND LEAVE DOOR AJAR AT FIRST CATCH. COOK FOR 1 1/2 HOURS ON ONE SIDE THEN FLIP OVER AND ROTATE TRAYS IF STACKED ON TOP OF EACH OTHER. COOK FOR ANOTHER 1 1/2 HOURS AND CHECK –SHOULD BE CLOSE FOR SLICED JERKY.
I don’t know if this recipe is any good, or if it is what Alyss had seen, but it is jerky with kefir:
http://onibasu.com/archives/km/14027.html
This is a yahoo group conversation about kefir beef jerky:
http://health.dir.groups.yahoo.com/group/native-nutrition/message/28795
I’m trying your recipe today. Thank you.
Hi there,
I was hoping some of you ladies could help set my mind at ease. I have a batch of this jerky going in my dehydrator right now; It’s been going overnight and looks like it’s just about done. I used good pastured beef from the local dairy that we also get our raw milk from so I trust the quality of the meat, but I can’t seem to get past this mental hurdle that the jerky is RAW. Dried, yes, but still…raw. But obviously you ladies love it this way, and you haven’t died of horrible food poisoning. 🙂
Oh, I’m probably being silly and just need to just try it but like I said, it’s a mental hurdle. :/
Becky
Becky — You know what, I consider this jerky cooked actually. The temp is high enough to achieve a low-temp cooking. Kind of like slow-cooking but not quite so hot. Still cooked, though. So you needn’t worry!
Thanks Wardee! I’m still a bit of a dehydrator newbie so I appreciate your input very much. It does help to think of it as slow-cooked. Isn’t it funny how we sometimes have mental hangups like that? Hehe, now I just feel silly. Well, I’m learning!
Hubby and I tried it this morning and we do like it although It’s a bit crispy so I bet I spread it too thin. I don’t think it would work on pizza this crispy, but it will be a great snack. I used 1/2 tsp of black pepper because I’m not a big fan but Hubby said “more pepper next time” 🙂
Thanks again Wardee! 🙂
Becky
Does this need to be refrigerated? Thanks!
Kim — Yes — unless you salt it much more heavily and dry it out more.
YES I WOULD AFTER A FEW DAYS EVEN PUT IN THE FREEZER WITH A PAPER TOWEL IN THE BAG AND COOLED DOWN GOOD IF YOU MAKE A BUNCH.
IT USUALLY WON’T LAST LONG. IF YOU USE GROUND BEEF OR DEER MEAT THE OLDER FOLKS WITH WEAK JAWS WILL ENJOY IT IF NOT TOO HOT. SPREAD THE LOVE ESECIALLY WITH OTHER WILD GAME JOY LIKE BEAR AND TURKEY JERKY-GOOD EATS–
Randy (or anyone else who has experience) …
I’ve been told that turkey and chicken (ie, poultry) needs extra attention when making jerky. Could you share how you make it? I’m especially interested in a ground recipe if you have it.
Thanks!
I USUALLY ORDER DIFFERENT JERKY SEASONINGS FROM LEM AND USE THE BACKWOODS JERKY SEASONINGS. YOU CAN MAKE JERKY USING ANY WILDGAME OR POULTRY WITH THESE DIFFERENT SEASONINGS.
I HAVE A JERKY CANNON AND WIRE RACKS ESPECIALLY FOR DRYING JERKY IN THE OVEN AT 200 DEGREES WITH DOOR CRACKED OPEN. I ALSO HAVE A NEW HARVEST DEHYDRATOR TO DRY IT AND I LOVE THE STACKABLE DRYING SCREENS TO DO ABOUT 4-5#’S AT A TIME WHICH THESE SEASONING PACKETS WILL DO IN A WHOLE BATCH USUALLY.
I HAVEN’T DONE POULTRY, BUT THE SAME INSTRUCTIONS APPLY AS FOR GROUND ROUND OR CHUCK ARE BEST LEAN GROUND WITH LESS FAT IN IT. IF I HARVESTED A DEER DURING SEASON I GET THEM TO PUT PART OF IT IN GROUND MEAT JUST TO MAKE JERKY. MY JERKY CANNON HAS 2 CHOICES OF ROUND STICKS BIG OR SMALL DIAMETER AND A ONE INCH FLAT JERKY ATTACHMENT FOR FLAT STICK JERKY.
USUALLY THE SEASONING AND CURE COME IN SAME PACKAGE TO MAKE A 5# BATCH OR SMALLER ONE POUND SIZES WITH INSTRUCTIONS OF HOW MUCH SEASONING AND CURE TO MIX WITH LIKE 2 CUPS OF COLD WATER FOR THE WHOLE BATCH TO MAKE APPROXIAMATLEY 5#.
I WOULD SUGGEST CHECKING WITH BACKWOODS WEBSITE OR HI-MOUNTAIN JERKY COMPANIES FOR EXACT MEASUREMENTS WITH POULTRY. I DON’T BELIEVE YOU NEED ANY EXTRA PRECAUTIONS FOR THIS, AS THE CURE IN THE PACKAGES WITH HELP IN THE PRESERVATION AND STORAGE. I USUALLY LET THE JERKY COOL OFF WITH A LAYER OF PAPER TOWELS BETWEEN LAYERS IN A COOKIE SHEET PAN AND THEN PUT A PAPER TOWEL IN EACH SIZE BAG YOU WANT AND FREEZE IT TILL YOU WANT A BAG FULL OF TOTAL ENJOYMENT–IF IT LASTS THAT LONG!
Finally planning to make this jerky this week for my husband and oldest son to take on a Boy Scout backpacking/camping trip. Hope it turns out!
I never see recipes for pork jerky. Is there some reason for that? Not safe? Other?
I don’t tolerate beef well right now and my son is not big on chicken. So we end up having mostly pork. Speaking of chicken, would chicken jerky work??
Coreen — You can use pork. Chicken is not recommended for much preservation, but it can be used in small amounts in combination with other ground meats.
Thank you! I’m going to have to try some pork jerky.
I WOULD TRY THE LEANEST CUT OF THE HOG-LIKE TENDERLOIN AND TRIM IT GOOD AND AFTER IT’S DONE DRY IN LAYER’S OF PAPER TOWELS AND LET COOL AND KEEP REFRIGERATED AND ENJOY THE OTHER WHITE MEAT.
Im having problem with cooking time in my Open country Dehydrator. It say 4-15 hours. Im not using ground venison, I cut up some wonderful backstraps. It has been on for almost 14 hours and still is a little red inside when i break it open. Is venison going to have that redness no matter what. Is getting pretty tough. But i like mine crunchy. But also want to make sure its done.
In my experience, they are a little red inside even when done. Just to check, take one out, let it cool fully and see if the texture is pleasing. Break it open — usually it is not red anymore after cooled down.
WARDEE I NOTICED TOO IF IT CRACKES A LITTLE WHEN BENT AND TASTES GOOD –JUST MAYBE 15 MINUTES LONGER AND COOL IN A COOKIE PAN WITH LAYERED PAPER TOWELS ON TOP AND BOTTOM TO SOAK OUT ANY MOISTURE AND LEAVE A PAPER TOWEL IN EACH PACKAGED BAG TO PUT IN THE REFRIGERATOR OR FREEZER IF YOU MAKE A BIG BATCH–
I BELIEVE I HAVE ONE OF THEM TOO. AFTER APPROXIMATELY 1 1/2 HOURS I WOULD TAKE TRAYS OUT AND ROTATE THEM AND FLIP JERKY OVER IN EACH TRAY AFTER JERKY GETS A LITTLE STIFF AND NOT STICKING TO THE TRAYS
IT USUALLY TAKES ME ABOUT 3 1/2- 4 HRS. IF MY BUTCHER SLICED IT FOR ME ABOUT 1/16″ THICK FROM A BOTTOM ROUND ROAST IF I’M OUT OF GROUND DEER–GOOD TO GO
USUALLY WHEN YOU USE THIS DEHYDRATORIN MY EXPERIENCE IS IF IT’S LEAN MEAT ABOUT 4 1/2 HRS WILL BE CLOSE. I’D TURN EACH TRAY AND ROTATE THE TRAYS TOO FOR QUICKER DRYING TIMESABOUT EVERY 1 1/2 HRS. IF WHEN YOU BEND IT CRACKS A LITTLE IT ABOUT READY. SOME OF THE TRAYS ON THE DEHYDRATOR MAY NOT DRY AS FAST AS THE OTHER ONES AND MAY NEED ROTATING .
USUALLY AFTER WHEN IT’S DONE IT DON’T HURT TO COOK IT 30 MINUTES LONGER, BECAUSE AFTER BAGGING IT UP AND STORING IN THE FREEZER OR REFRIGERATOR IT WILL SOFTEN UP SOME AND NOT TOO BRITTLE. THE BEST THING I CAN TELL YOU IS WHEN IT TASTES GOOD NEAR WHEN IT’S DONE IS THE BEST INDICATOR FOR YOU’RE PERSONAL BATCH IS DONE.–CAN’T EAT JUST ONE-BAD ON YOU;RE SORE TEETH SOMETIMES, BUT YOU’RE STOMACH WILL LOVE YOU.
YES USUALLY DEER MEAT WILL STILL BE RED INSIDE–IF IT’S SLICED 1/8TH-1/4″ INCH SLICES MY DEHYDRATER LIKE YOU’RE OPEN COUNTRY ONE TAKES ABOUT 4–4 1/2 HOURS AND WILL CRACK WHEN BENT IN MIDDLE.. I USUALLY ROTATE TRAYS AND TURN EACH PIECE OVER AFTER FIRST 2 HOURS. TASTE A PIECE IF IT LOOKS READY AND IF GOOD TO YOU’RE LIKING–GOOD TO GO
DRY WITH LAYERED PAPER TOWELS ON COOKIE SHEET FOR A FEW HOURS AND YOU CAN FREEZE IT. USUALLY THE JERKY AFTER COOLING DOWN AND RESTED WILL BECOME MORE SPONGIER, SO A LITTLE BRITTLE WHEN DRYING WILL BE JUST RIGHT AFTER REFRIGERATING OR GETTING A BAG OUT OF THE FREEZER–LOVE IT!!
I do similar spices, but add a bit of Coconut Aminos, and a touch of honey occasionally. I also use the beef heart, let it thaw just enough to cut, trim the outside fat etc off, then grate it. Voila: a ground beef that is very lean (it is the fat that goes rancid in jerky as I understand it). Then when it is all mixed up, I line 2 narrow bread pans with parchment, pat it nice and even and freeze, then thaw just enough to slice again and slice it 4mm thick (I use the food processor). Then dehydrate (same way as your version). We all love it, but the kids sneak it out of the fridge so they get more than I do 🙂
I’ve always used wheat-free tamari, garlic powder, sea salt, and brown sugar to give it a teriyaki style taste, but I’ve never done it with ground meat before; maybe when buffalo is on sale (though we usually just have our buffalo burgers).
Davette — That sounds GOOD. 🙂
just spotted this post and i’m so happy! i always used to make jerky with those seasoning packets from the store, but as i’ve been cleaning up my families diet i cut them out (they are full of nasty things!). so excited to try and make it from scratch. 🙂
Just made this recipe…love it! Can’t wait to try other seasonings.
Thank you!
What do you think about making jerky out of turky burger? Is it safe?
Dana — What I know of poultry is that it is best to blend ground poultry meat with beef or pork for foods like this. I can’t remember why though… 🙂
Thanks for this, wanting to try and make this in an oven as we have not yet acquired and dehydrator.
Anyone ever do this in the oven?
Anyone ever add some ground beef liver to this, cooking at low temp would be good for the benefits. Taste wise?!?!?!
If you have input, thanks!
I am looking for a turkey jerkey recipe. Anyone have a good turkey recipe. I like the ground meat idea. I would think it would be easier to eat. I am on a diet that allows me to eat turkey jerky but not beef. Thanks for any help you can give me.
ORDER FROM A GOOD SUPPLIER OF WILD GAME JERKY SEASONING ONLINE LIKE HI-MOUNTAIN OR BACKWOODS. THEY HAVE A BUNCH OF DIFFERENT BLENDS AND CURES IN EACH PACKAGE AND EASY TO USE INSTRUCTIONS FOR EACH AMOUNT OF WEIGHT OF MEAT. I WOULD TRY THEIR ORIGINAL BLENDS OF WHICH IS NOT TOO HOT OR SPICY.
I used Venison. I split it to 3/4 lb each for 2 different batchs.
the first i ground and used just under 1/2 cup of Tamari, with 2 tsps sea salt, ground black pepper, 2 tsps ground garlic, 2 tsps brown sugar, and some cheyanne pepper. Came out great.
The second, I used just under a 1/2 cup homemade gluten free BBQ sauce, 2 tbsp fresh squeezed Orange Juice, 1 tsps brandy, 1 tsps maple syrup, 2 tsps sea salt, 1 tsp brown sugar, pinch of Cajun seasoning, pinch of black pepper.
The first was good. The second, AMAZING. Enjoy.
Never thought about putting in on pizza!
I make that a lot. Have a batch in the fridge right now!
I am doing a 30/70 split of ground beef and turkey with a honey based glaze in my dehydrator; half on no stick trays half on fruit leather trays. Cannot wait to tray it!
I’ve had great success with making jerky with both beef and venison using this recipe or adaptations of it:
Ingredients
• 1 pound boneless venison roast
• 4 tablespoons soy sauce
• 4 tablespoons Worcestershire sauce
• 2 tablespoons liquid smoke flavoring
• 1 tablespoon ketchup
• 1/4 teaspoon pepper
• 1/4 teaspoon garlic powder
• 1/4 teaspoon onion salt
• 1/2 teaspoon salt
I don’t have liquid smoke, so that was omitted and I use tamari sauce instead of soy; or bragg’s liquid aminos.
I have not tried the ground beef yet, though.
About the ground liver: can you taste it in the finished product? Where do you get? my butcher wont grind organ meat or the fat. Do you grind your own? Thanks in advance!
Hi Wardeh! Found the TX WAPF kefir soaked jerky recipe!! 🙂
http://www.traditionaltx.us/articles.htm
Christi
Would you happen to know the shelf life of this jerky? How could it be stored to extend the shelf life? Thanks!
Vacuum sealing bags and adding 15% chopped raisins. The raisins also act as a preservative.
Thanks, would you know what the shelf live would be?
Cat — Not too long with these and in fact they should be refrigerated. If you drain the fat and salt more heavily, the shelf life is a few months.
The raisons do nothing in the way of acting as a preservative! Salt in the jerky marinade or dry jerky ingredients is the preventative that allows the finish product to last so long without spoiling. Look at almost any jerky recipe and you will see how much salt is in it, either in wet form as soy or worcheshire sauce or in dry form as seasoned and plain salts.
SO hoping to get a response but I know this is an old post so if not I understand. Making turkey ground jerky with your recipe. Put it in at 10pm and around 7am flipped it over. The underside wasn’t cooked. It is all cooked now but wondering if it’s safe to eat or if I should pop it in the oven at 275 for 10 minutes or so if that even helps. Again HOPING to hear from you as I consider you a great source! Thanks!
Belinda — You can definitely cook it more if you think it needs it. I think I would if I knew it still wasn’t cooked after the overnight drying. Do you think it was too thick or what?
How long will this jerky last and what is the best way to store it?
Thank you!
Hi Marcy,
Wardee answered your question in today’s podcast: https://traditionalcookingschool.com/2014/10/31/kyf-090-curly-hair-styling-more-listener-questions/
Is it possible to make this jerky without a dehydrator? Can you use the oven?
YES YOU CAN USE THE OVEN –I USE A LOT OF HI-MOUNTAIN JERKY SEASONING AND IF NOT USING DEHYDRATOR THIS IS THE WAY WITH OVEN, SET OVEN TEMPERATURE TO ABOUT 200 DEGREES, IF YOU CAN GET MEAT SLICED AT STORE ABOUT 1/8” THICK, PUT ON JERKY RACK OR COOKIE RACK , CRACK OVEN DOOR OPEN, AND COOK APPROX. 1 HOUR AND 30 MINUTES, TURN OVER AND COOK SAME TIME ON OTHER SIDE.
TEST IT OUT TO YOU’RE LIKING AND TASTE THE GOODNESS. COOK LONGER IF NEEDED–THANKS RANDY
It’s in my Nesco now! I added some liquid smoke (just smoke and water) and we are excited!!!
Oh! That’s nice. I like it & add a lot of spices to this jerky recipe. But I am doubt, really it is safe?
I used the recipe above using ground bison. The only additions I made were a bit of cajun seasoning, a few shakes of white pepper, & a little sprinkle of liquid smoke. Both my husband & adult stepson approve of the results. Maybe I can learn to dehydrate food after all! ?
Thank you, Wardee!
I have several sizes of large rubber bands that fit over my rolloing pin. They are for rolling cookie dough. But they work well for rolling out your jerky, too. As a butcher I know how important it is to get a consistant thickness. I prefer to use ground meat as I don’t have my own slicer.
I’ll try your recipe tomorrow. Thanks for sharing with us.
I’ve been trying to make ground turkey jerky but it falls apart and too watery. What can I mix with it to thicken it up? I’m using a small jerky gun, like a caulking gun. Thanks
Hi, Jeff,
That is a good question! You might try freezing the ground turkey mixture SOMEWHAT before hand so it’s more solid. Let us know how it turns out. 🙂
~Peggy, TCS Customer Success Team
Would this jerky be pantry or cold-room stable, maybe if vacuum packed even? Thanks.