
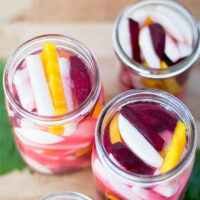
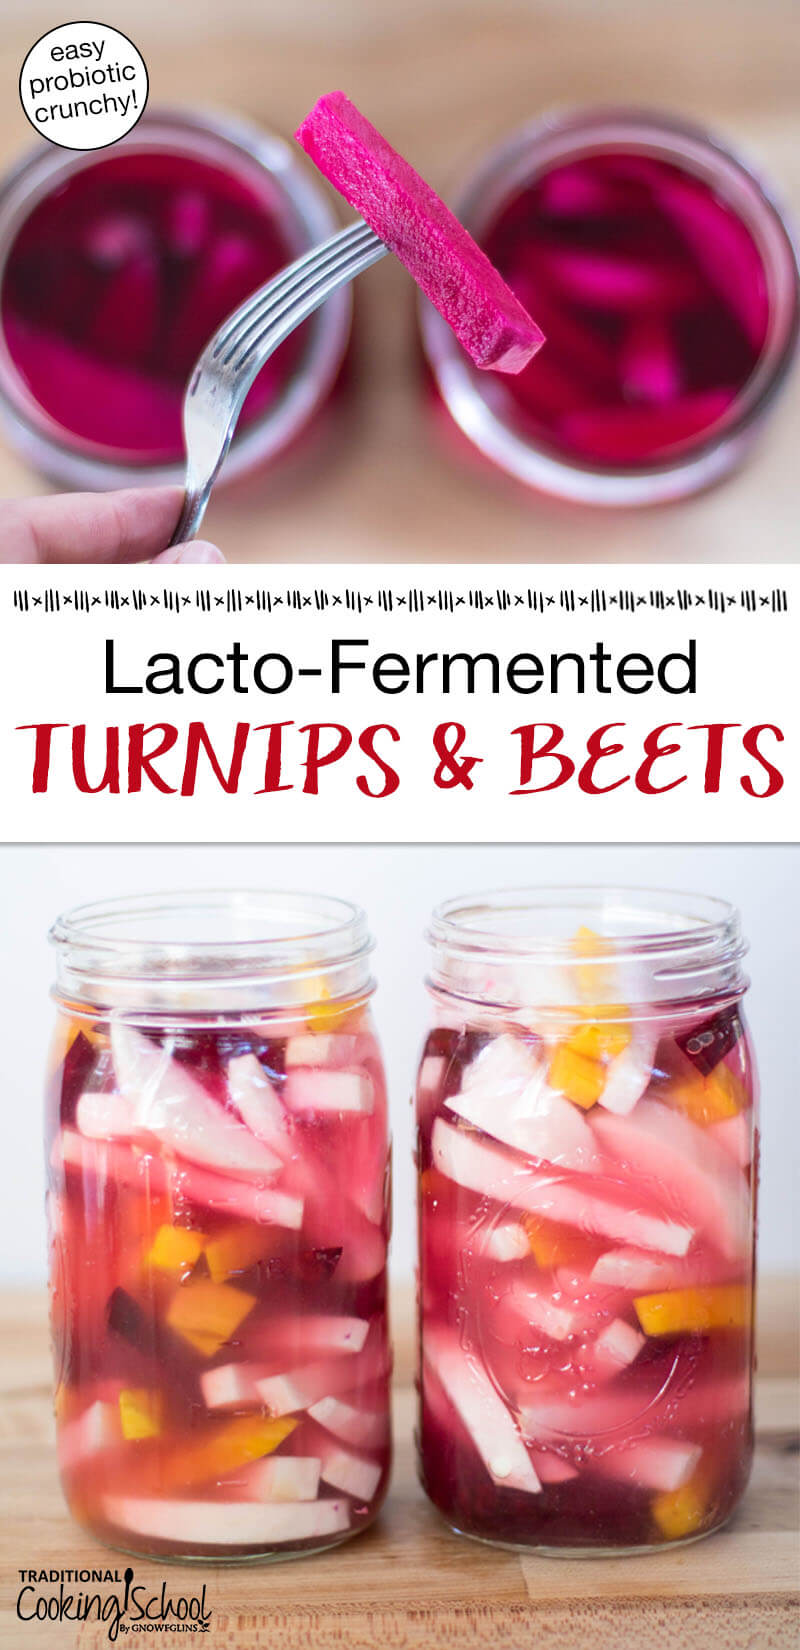
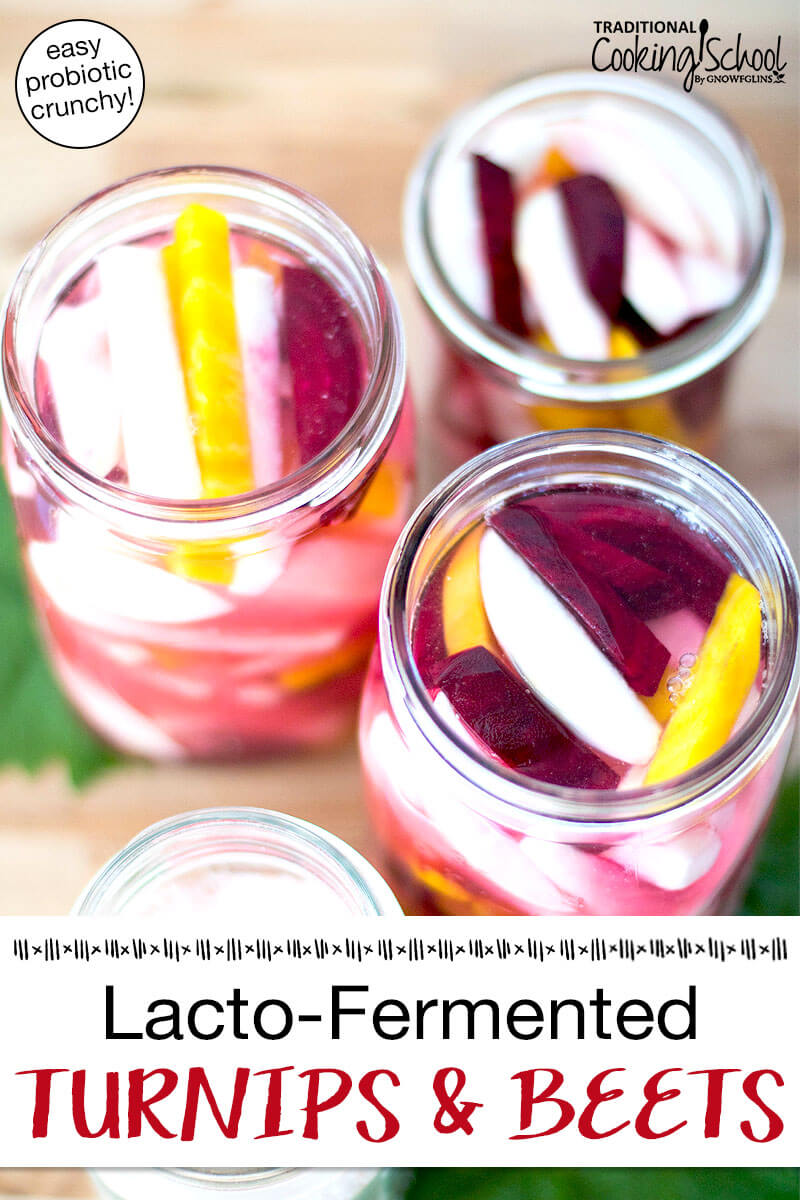
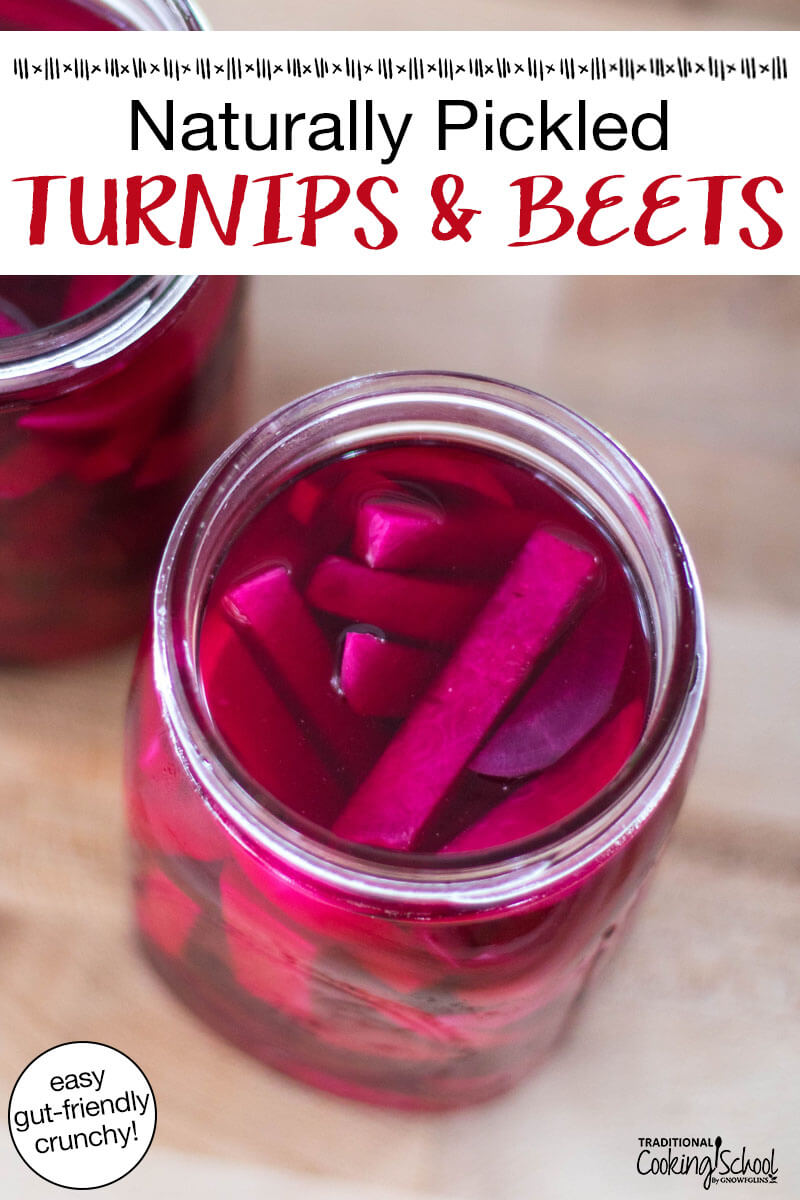
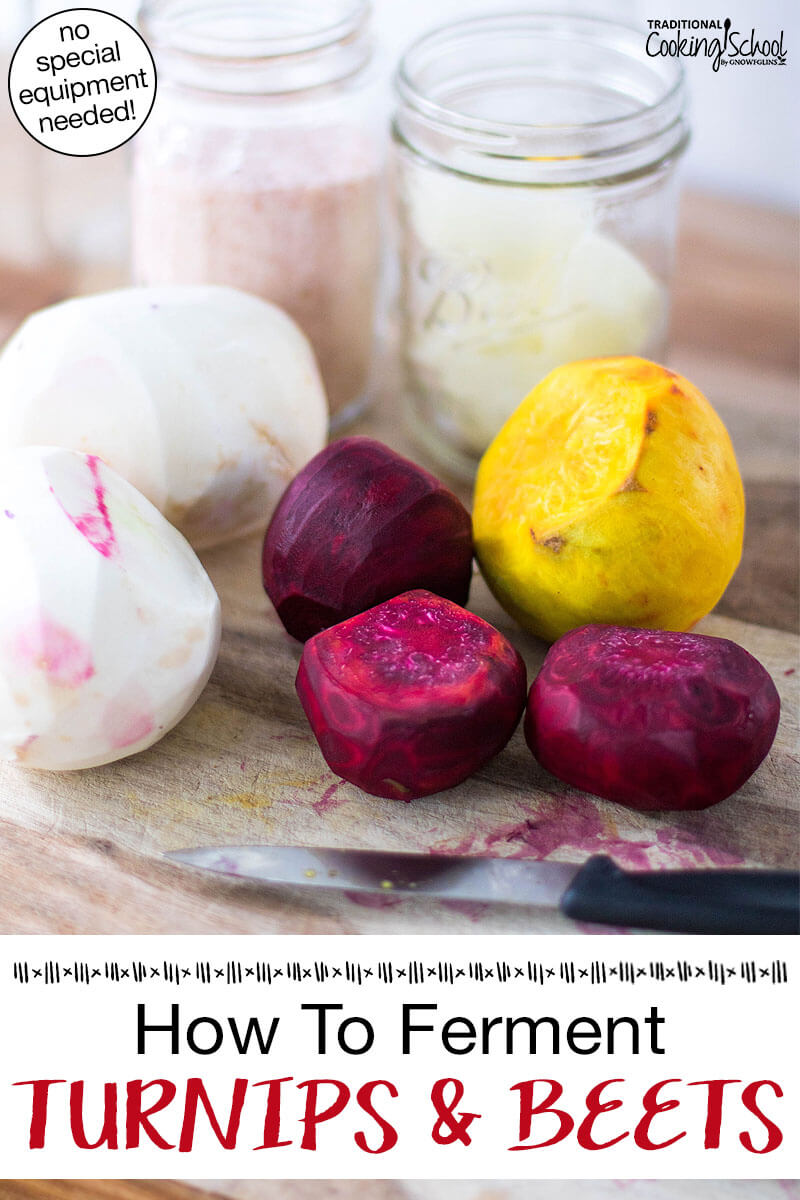
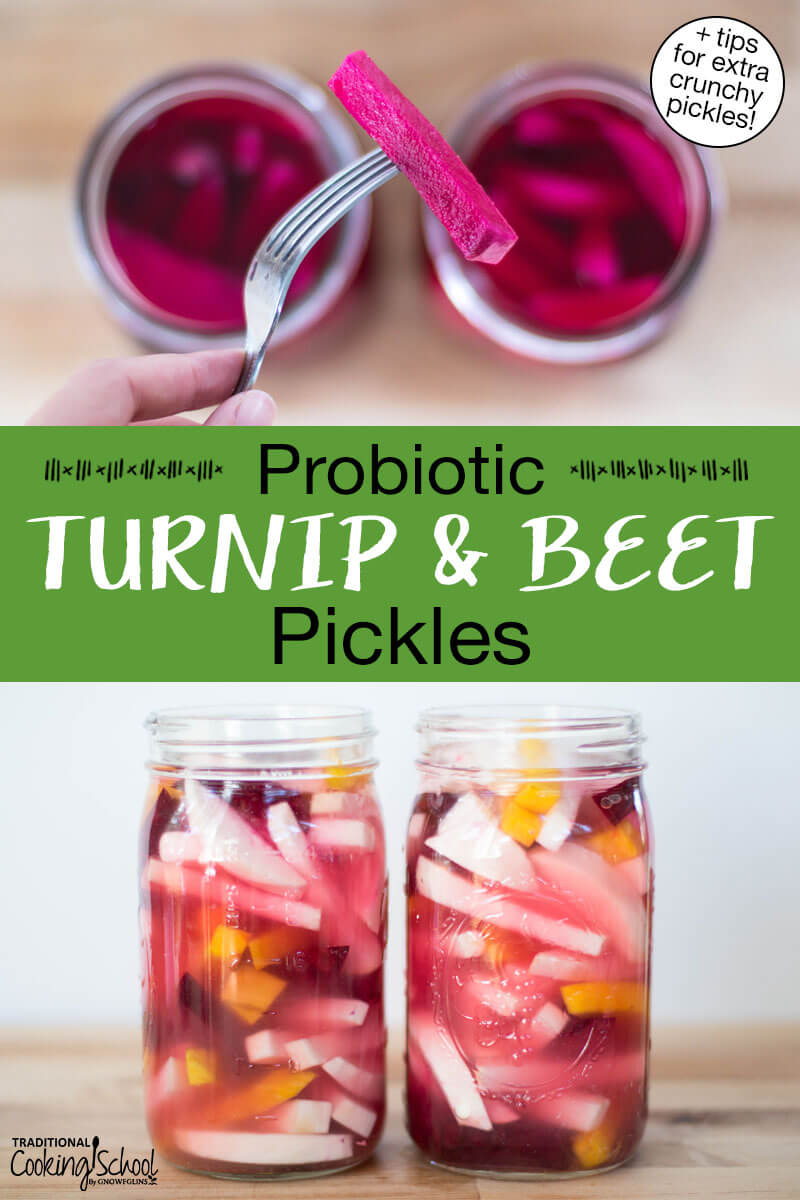
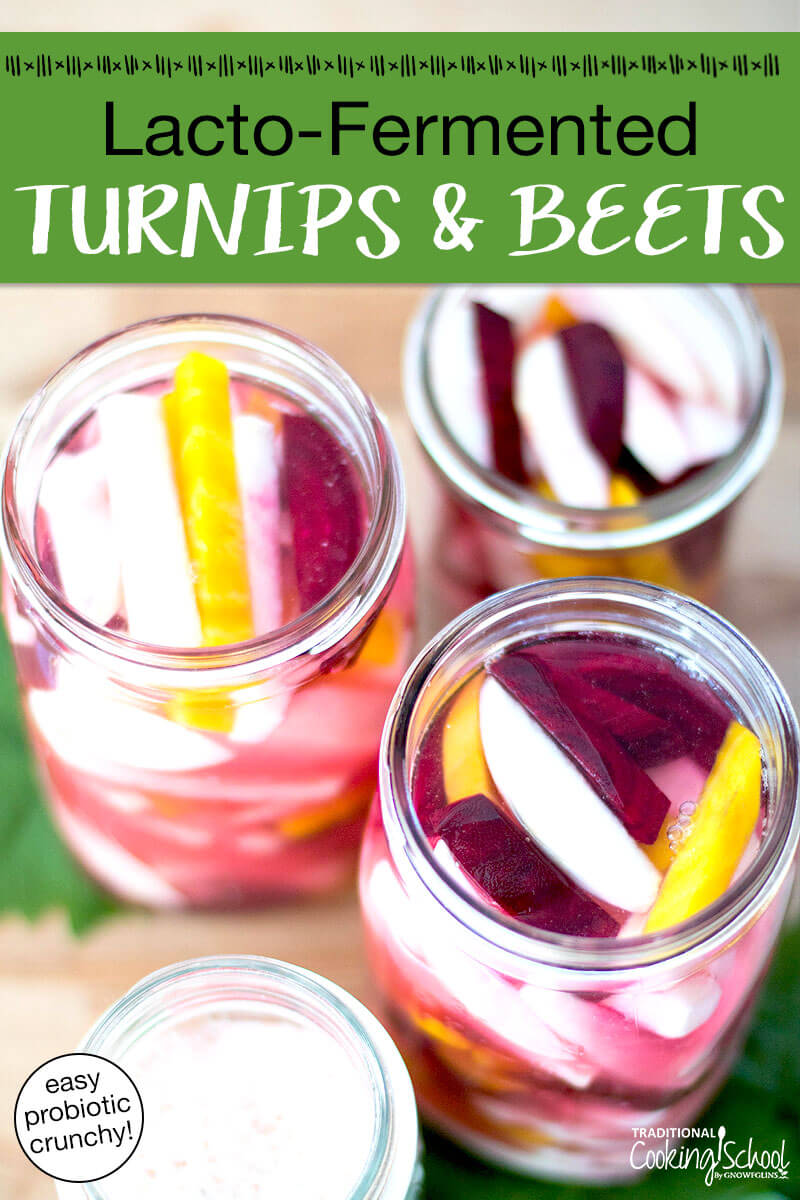
Gut-friendly and extra crunchy, these lacto-fermented turnips and beets are naturally pickled, totally raw, and made in only three days of fermenting time. We love the burst of fresh flavor they bring to salads and sandwiches!
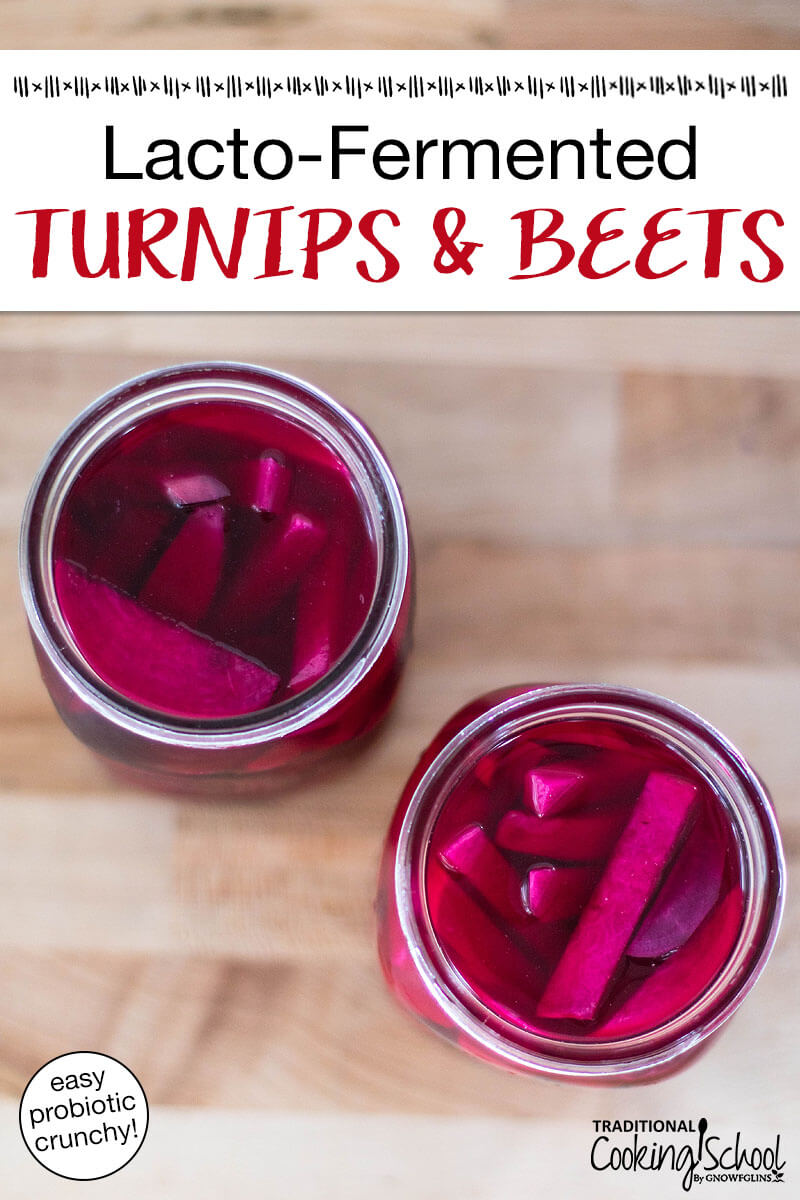
Table Of Contents
Why Lacto-Ferment Foods?
Traditionally, food was preserved through fermentation, without freezers or canning machines. Through the fermentation process, the salt and/or whey inhibits the growth of putrefying bacteria until enough lactic acid is produced to preserve the vegetables for many months.
And, the lactobacilli (beneficial bacteria) which produce lactic acid do much more! They enhance the digestibility of the vegetables, increase vitamin levels, produce enzymes, offer antibiotic and anti-carcinogenic substances, and support the growth of healthy flora in our intestines.
All this just from natural pickling! Compare that to many store-bought pickles, which offer nothing but pasteurized vegetables floating in an acidic brine of white vinegar.
Check out Nourishing Traditions, page 89, for more information about all of this.
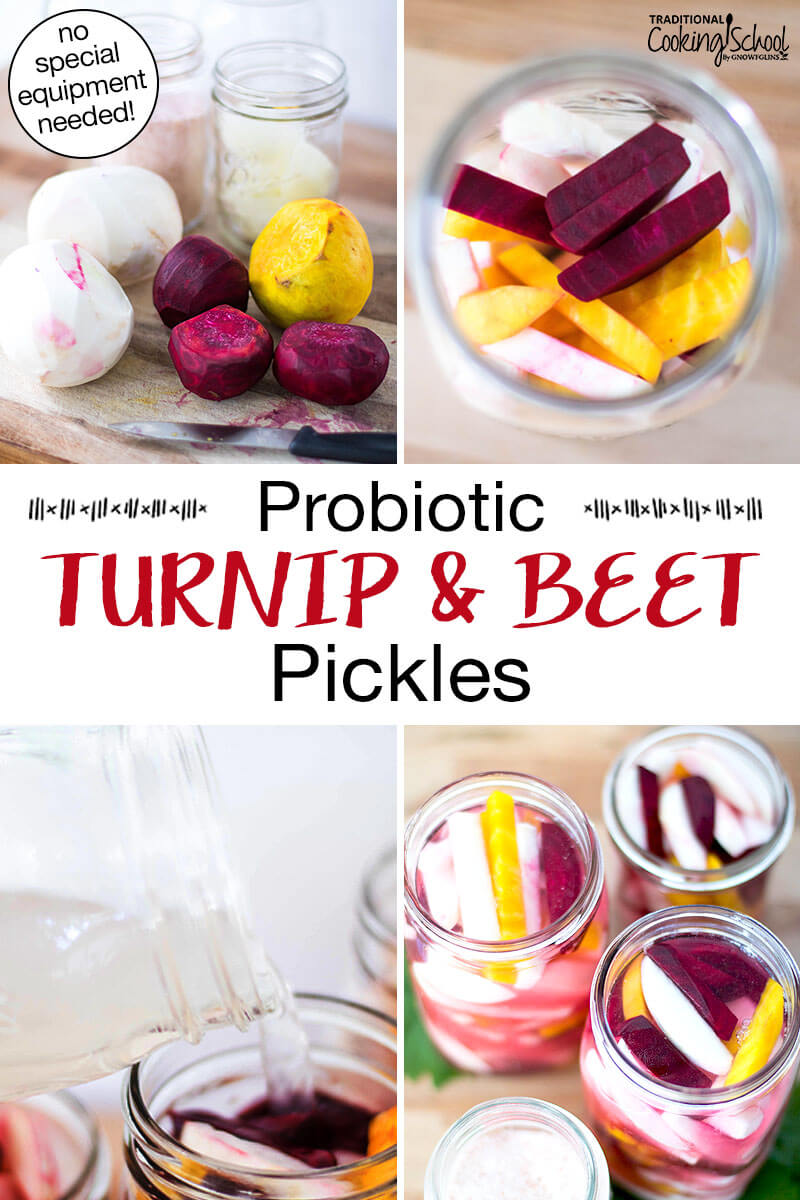
Fermented Turnip & Beet Ingredients
- Turnips – Organic and/or local, if possible.
- Beets – Organic and/or local, if possible.
- Sea salt – Choose a high-quality, fine-grain, mineral-rich salt. Don’t use store-bought, commercial iodized salt. Salt is not optional since it protects the fermenting foods from putrefying bacteria while allowing the beneficial bacteria necessary for proper fermentation to thrive. It’s essential, in the amount written below, for safe fermentation.
- Pure water – Use mineral-rich, chlorine-free water rather than contaminated well water or straight city water which may contain chlorine, chloramine, and/or flouride, etc. Mixing chlorinated water with cultures can affect your lacto-fermentation recipes. If your water is not clean or you don’t filter it, I recommend purchasing spring water or filtered water (here’s how to choose the best water filter for your family!). If your water is filtered and does not re-add minerals back, consider fortifying it with natural mineral drops. I discuss using reverse osmosis water for fermenting in this #AskWardee.
- Whey – Although optional, the use of whey in ferments kickstarts fermentation and helps ensure consistent results. Learn how to make whey here. If you’re dairy-free, you can use leftover fermenting juice from pickles or sauerkraut instead at the same rate as whey.
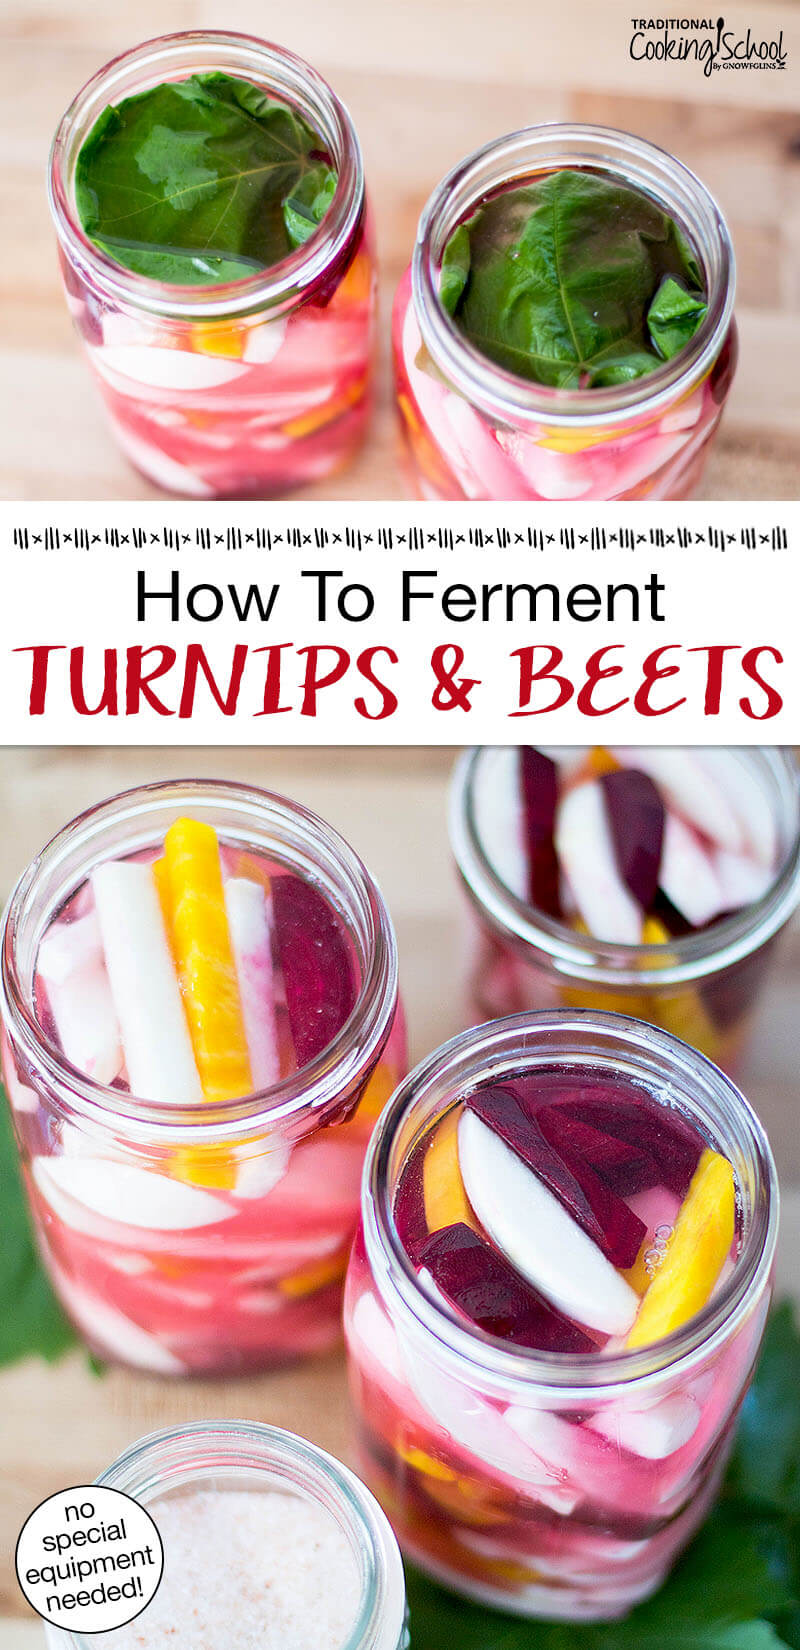
- Grape leaves – Also optional, yet recommended as the tannins in grape leaves make for extra crunchy turnip and beet pickles! You can use a pinch of black tea leaves, or a few oak leaves instead.
Tools & Equipment
You don’t need fancy equipment to ferment!
- Glass jars – You will need quart-sized glass jars, preferably wide mouth although regular mouth jars will work in a pinch.
- Metal bands and lids – For covering the jars of turnips and beets as they ferment.
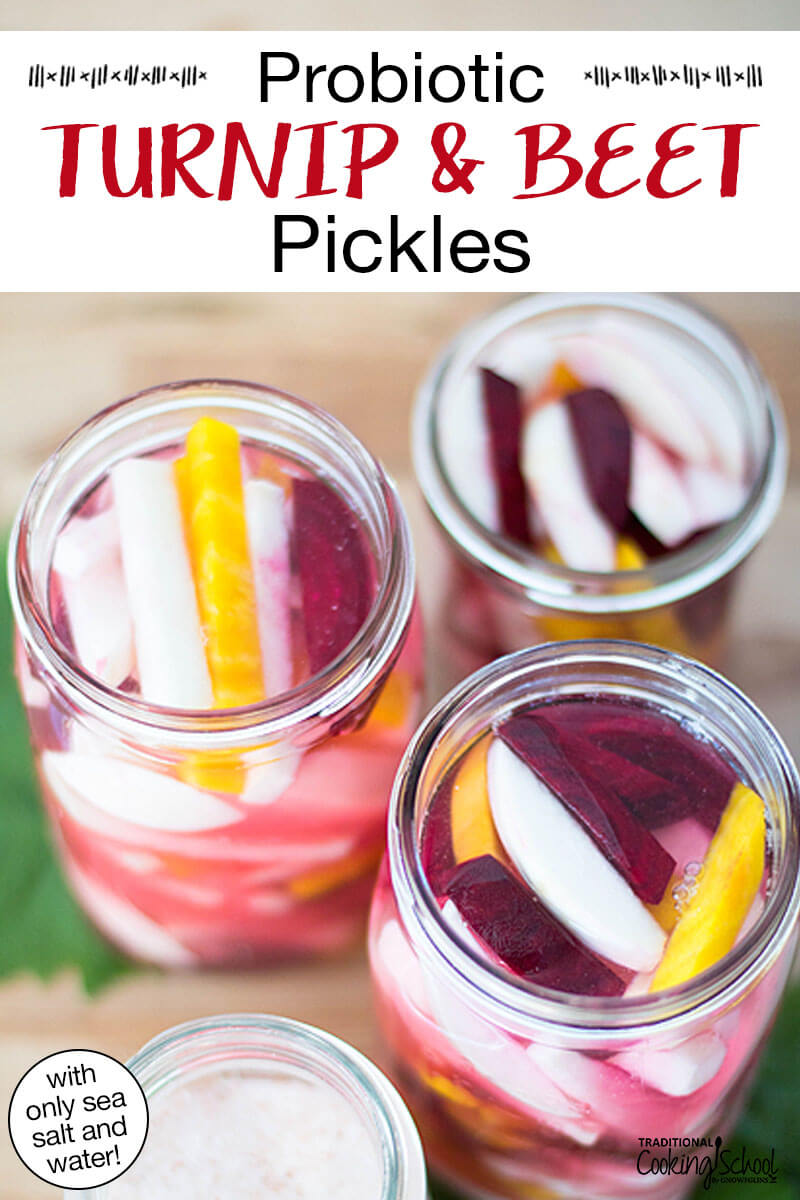
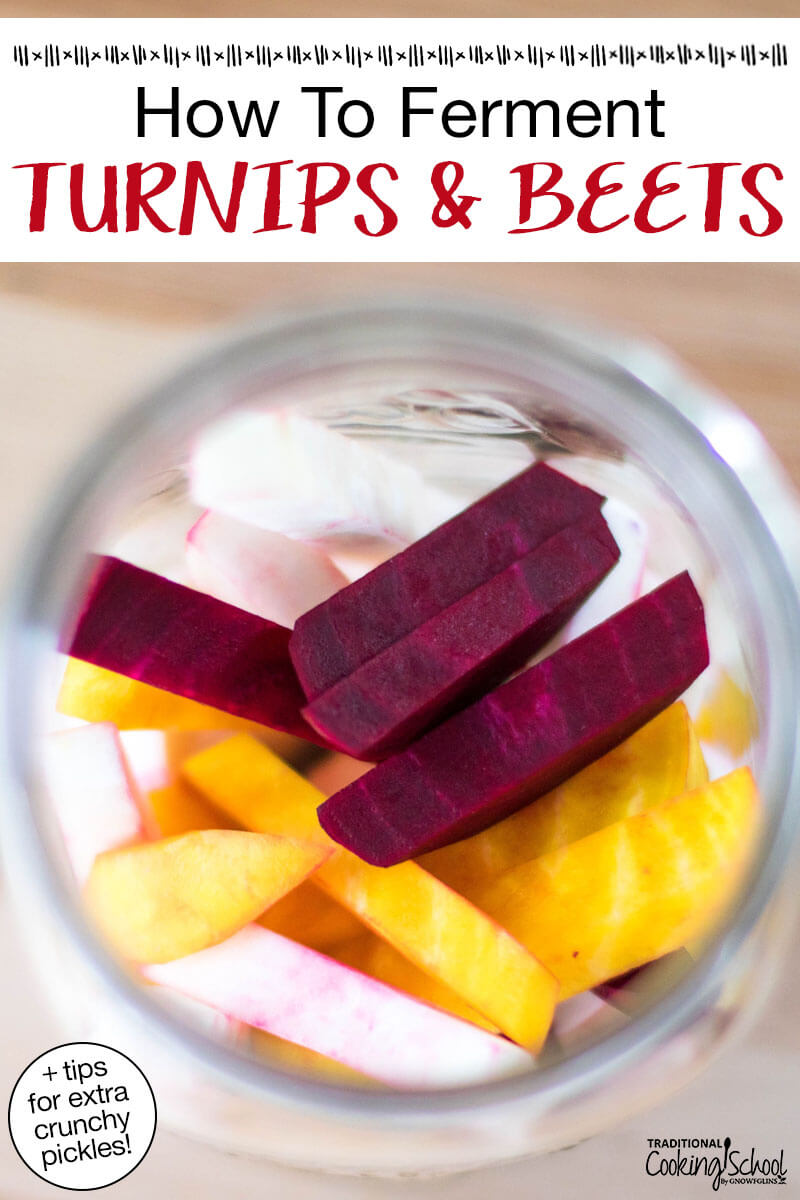
How To Make Fermented Turnips & Beets

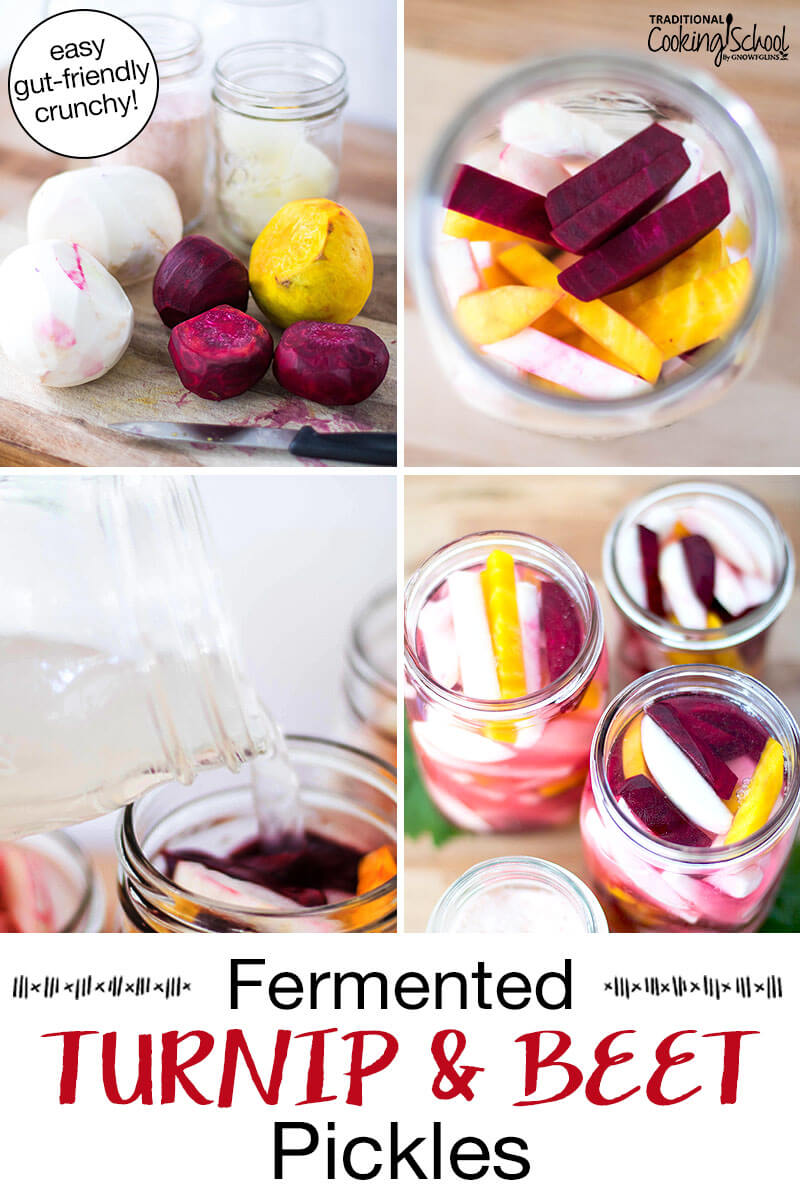
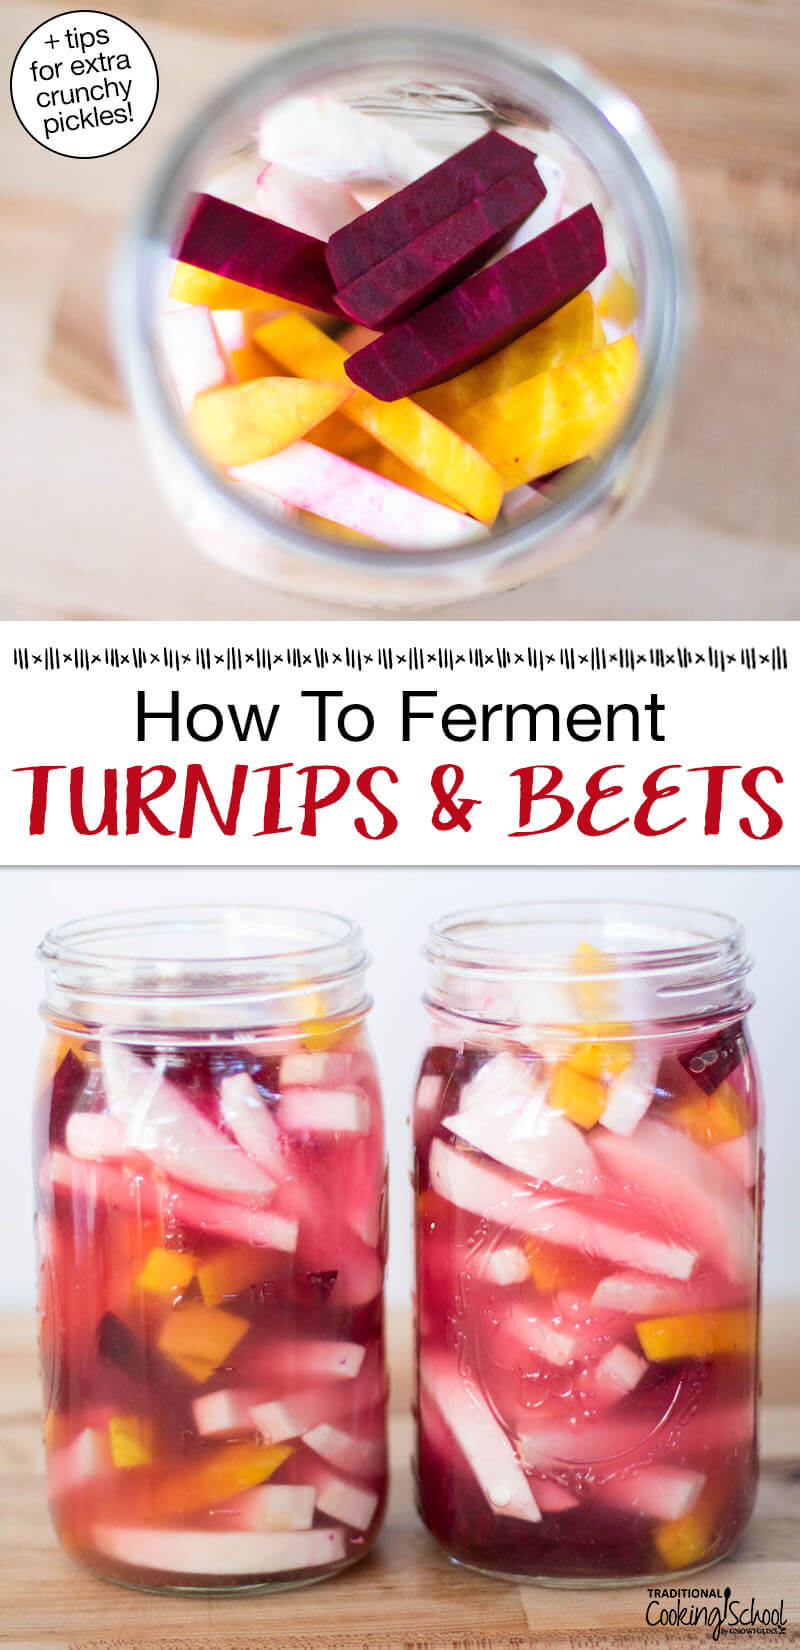
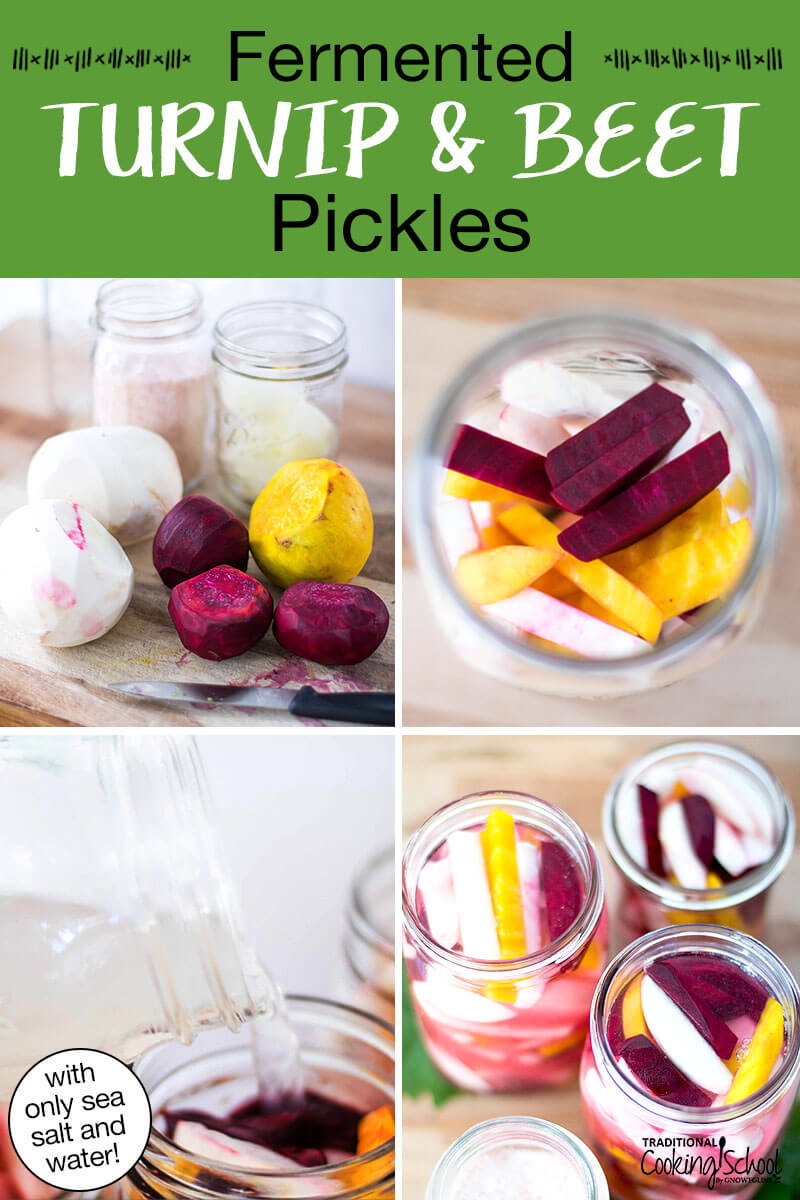
- Make your brine by dissolving salt in water. Simply combine salt and water in a half-gallon jar and stir until the salt dissolves.
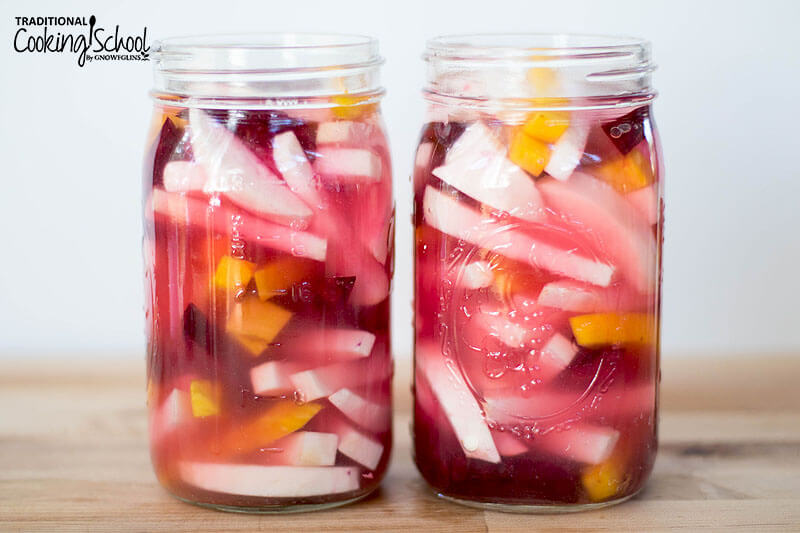
- Peel, quarter, and slice the turnips and beets.
- Mix them up to incorporate.
- Fill as many quart jars as necessary to use up all prepared vegetables.
- Press down on the veggies to make sure they’re packed in well and don’t fill up higher than within 1 inch of the top.
- Pour whey, if using, and brine over top.
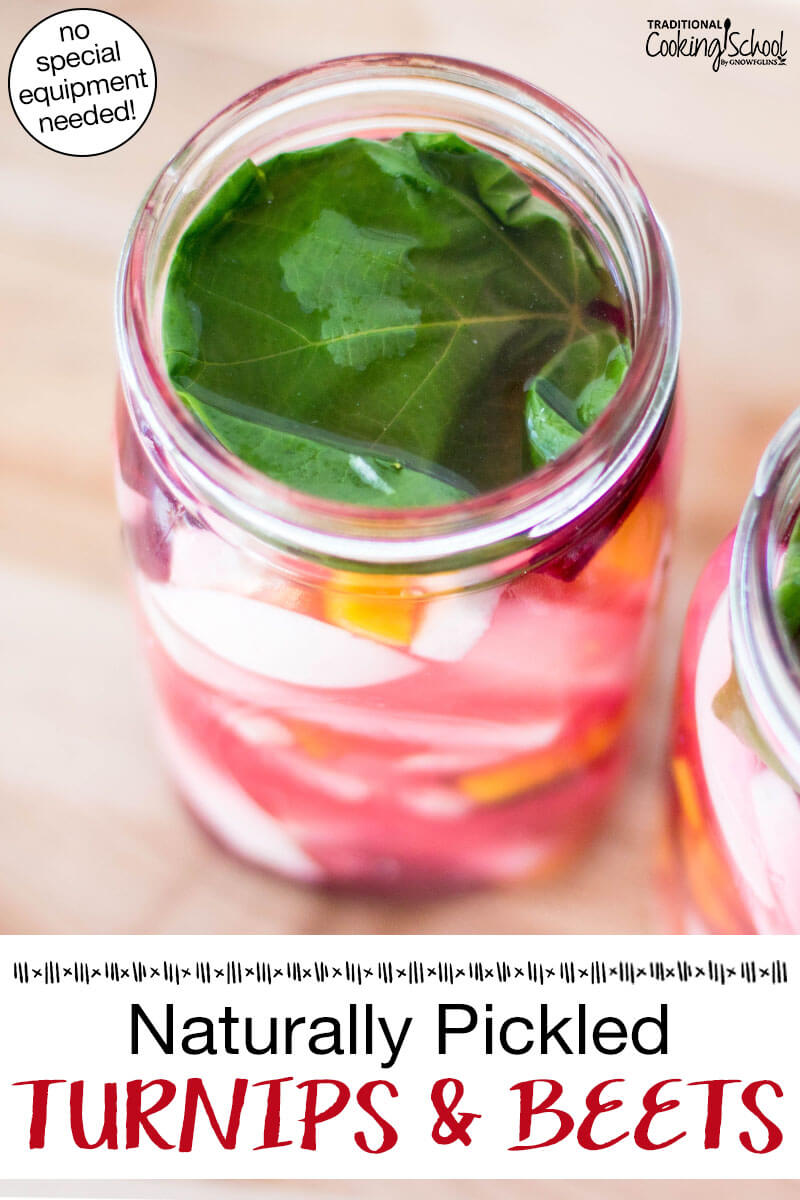
- Add a grape leaf, if using, to each jar and tuck in around the edges of the vegetables to help keep them submerged in the brine.
- Put the lids and bands on the jars and tighten securely.
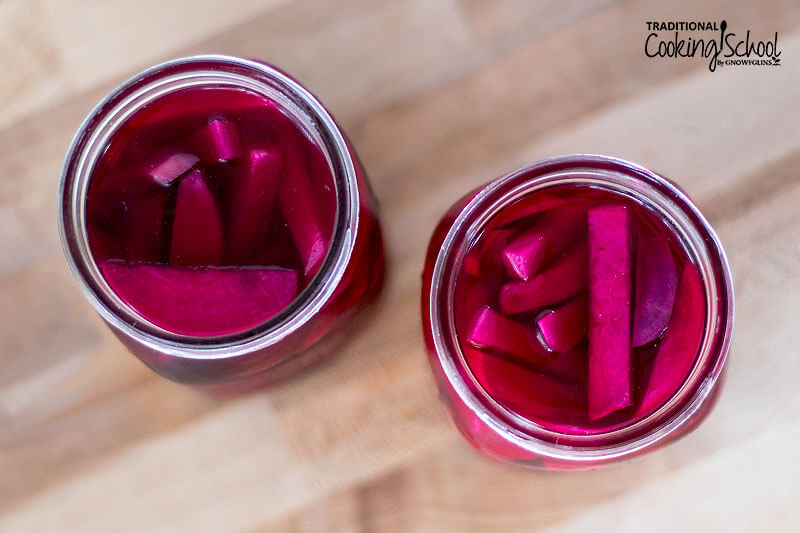
- Leave on the counter at room temperature for about 3 days. Look for bubbles as a sign that fermentation is happening (if you don’t see bubbles, read my tips below). The color will also deepen.
- Transfer the jars to cold storage until you are ready to eat them.
Recipe Tips & Troubleshooting
I’m dairy-free. Is there another other starter culture I can use instead of whey?
Yes! You can use leftover fermenting juice from pickles or sauerkraut instead at the same rate as whey.
Help! I don’t see any bubbles in my fermented turnips and beets.
Look for other signs of fermentation, such as texture changes, color changes and the whole mixture starting to develop sourness from the lactic acid that’s produced. If you’re seeing these signs, all is well. If you’re not, is your ferment kept in a warm enough place to allow the beneficial bacteria to thrive?
I think I see mold in/on my pickled turnips and beets. Is it safe to eat if I skim it away, or should I toss the whole thing?
It depends. Please reference this post for preventing mold during fermentation, and what to do if it happens.
How can I tell if my turnip and beet pickles are spoiled or not?
Trust your nose! Though be aware that if it repels you but is not spoiled, it might be because you’re unaccustomed to fermented foods and need time to adjust to a new normal. If you aren’t sure, you can take a little taste and see how it goes. It’s always okay to be on the safe side and compost the ferment or feed the chickens with it.
Check out this #AskWardee for the signs that your ferment is on the right track. And here are hard and fast signs that a ferment has gone wrong:
- It’s moldy. Pink or fuzzy is not good.
- It’s mushy.
- Its smell repels you because it’s putrid or rotten, not just sour. Your nose KNOWS this!
- When you taste it, it gives you an upset stomach. (Don’t confuse this with a healing reaction, though.)
Any time you get into a jar, repack it carefully to keep all food submerged and under the protection of the brine.
How can I tell if my fermented turnips and beets are done?
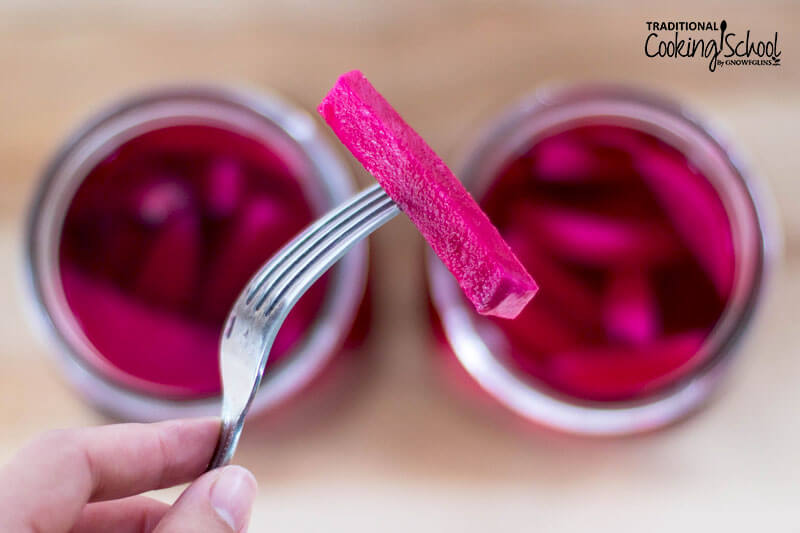
As you can see in the photo above, the color will deepen into a beautiful burgundy. Beyond that, go ahead and open a jar up to smell and taste it!
No two ferments are going to be exactly alike — this is a flexible process and you really have to open the jar and dig in to see what’s going on in there. I discuss the typical signs of a finished ferment in this article.
Ways to use fermented turnips and beets.
I usually serve our pickled vegetables topped on a green salad, or as a side with a cold cut type of meal (meat salad, bread, and cheese). These veggies taste bubbly, spicy, and fresh, while offering a great crisp and crunch. I love them!
Other Fermented Condiments
- 3 Lacto-Fermented Mustard Recipes (zippy, zingy flavor!)
- Lacto-Fermented Homemade Ketchup
- Lacto-Fermented Mayonnaise
- Homemade Sauerkraut In A Stoneware Crock
- Homemade Kimchi: An Easy Korean Sauerkraut Recipe
- Old-Fashioned, Crunchy, Fermented Garlic-Dill Pickles
Have you tried these lacto-fermented turnips and beets? Please give us a rating on the recipe card below. Then snap a photo of your homemade turnip and beet pickles and tag us on social media!
Lacto-Fermented Turnips & Beets
Gut-friendly and extra crunchy, these lacto-fermented turnips and beets are naturally pickled, totally raw, and made in only three days of fermenting time. We love the burst of fresh flavor they bring to salads and sandwiches!
Ingredients
- 1/2 gallon pure water
- 6 tablespoons sea salt
- turnips peeled, quartered and sliced
- beets peeled, quartered and sliced
- 1/4 cup whey optional; per quart
- 1 grape leaf optional; per quart
Instructions
-
Make your brine by dissolving salt in water. Simply combine salt and water in a half-gallon jar and stir, stir, stir until the salt dissolves.
-
Peel, quarter and slice the turnips and beets.
-
Mix them up to incorporate.
-
Fill as many quart jars as necessary to use up all prepared vegetables.
-
Press down on the veggies to make sure they’re packed in well and don’t fill up higher than within 1 inch of the top.
-
Pour whey, if using, and brine over top.
-
Add a grape leaf, if using, to each jar and tuck in around the edges of the vegetables to help keep them submerged.
-
Put the lids and bands on the jars and tighten securely.
-
Leave on the counter at room temperature for about 3 days. You will know they are fermenting because the mixture in the jar will be very bubbly.
-
Transfer the jars to cold storage until you are ready to eat them.
Recipe Notes
This recipe is easily scaled up or down. I have called for enough water and salt to make 1/2 gallon of brine, which is enough brine to cover at least 3 quarts of vegetables.
Don't have enough brine to cover all of your turnips and beets? Make more brine in the same ratio of water to salt.
Have too much brine? Store in a sealed jar at room temperature for a few days and use as needed in other fermenting recipes. If not used within a few days, transfer to a non-glass container, such as an empty milk jug, because otherwise the jar might crack.
This post was originally published and written by Wardee Harmon on 6/3/09. It was updated and republished on 6/9/21.
...without giving up the foods you love or spending all day in the kitchen!

2 free books:
Eat God's Way
Ditch the Standard American Diet, get healthier & happier, and save money on groceries...
We only recommend products and services we wholeheartedly endorse. This post may contain special links through which we earn a small commission if you make a purchase (though your price is the same).

Wardee,
The liquid from the pickled veggies mixed with a little lemon juice, and perhaps some herbs of choice, makes a really delicious salad dressing.
This is the only kind of pickling that we ever did when I was growing up.
Sylvia – Awesome! That’s just what I needed to know! Thank you!
Don’t forget to add some oil to your dressing, as fat is needed to aid in the absorption of the nutrients in the salad.
What lovely photos! I make lacto fermented pickles out of just about every vegetable that comes my way 🙂 The best recipe I have found for introducing people to fermented pickles is my spicy carrots. I slice carrots into long rounds (slice the carrot on a steep diagonal) and mix them with sliced onions and garlic. I add some sliced jalapenos (to taste, half a jalapeno in a pint jar will make the mixture spicy but not too hot – add more if your family likes more heat) and cover with brine and then ferment just like you describe here. These are great with burritos and quesadillas.
Also, I don’t measure salt anymore when making pickles. I add salt to the water until it is “too salty to be tasty but not salty enough to be gross.” It evens out to about the same amount of salt but since you are using your taste instead of a spoon to measure it you never end up with grossly salty pickles.
Alyss – Thanks for sharing your best recipe! I will try it, for sure. I know my husband will love them! I hope to develop your confidence in tasting to know whether or not the brine is salty enough. Thanks for the great ideas!
In my family we like to take a swig from the jar of our fermented foods whenever we are browsing the fridge. Garlic pickle juice is our favorite. Even my 1 and 3 year olds like to drink it straight from the jar. Thanks for the turnip recipe. I feel like fermenting is the perfect thing to do with the odd vegetable.
Wardee,
I’ve been wanting to try this for the longest time. I just might finally do it! I am just a little nervous, since I DON’T like kefir or yogurt, but I do want to give them a try.
Your photos are lovely, as always. 🙂
Cinnamon – Hee, hee, I’ve been doing that myself! I like the flavor of the brine very much, though it is on the salty side. 😉 I have not tried garlic pickle juice. I like what you said, that fermenting is for the odd vegetable. The other day, a friend on facebook mentioned that she pickled watermelon rinds for the first time. Now there’s the odd leftover… perfect for pickles! (She said they turned out well.)
Mindy – Try them. Just try and see. Do you like pickles in general? Have fun with it! I’ll be waiting to hear… 😉 Maybe you should start with a carrot recipe, like Alyss suggested. Or the Ginger Carrots in Nourishing Traditions.
I don’t eat fermented dairy either, due to really disliking the taste; but I do love all kinds of fermented vegetables! And the left-over liquid when the vegetables are all gone–I pour that into one big jar, and drink it as a probiotic tonic. The taste is always changing, due to whatever juice I pour in, so it never gets boring.
Wardee,
Check out the recipe for Beet Kvass in Nourishing traditions, I think you’ll find it’s essentially the same thing as the pickle juice but with beets. Amazingly nourishing and tonifying. Tasty too!
Lainey – Thanks for mentioning that! You’re right! Of course I’m going to try it!
I made the kimchi recipe in Nourishing Traditions. It was really good. Two of my four children are Korean and we love kimchi. I need to try beets and turnips. I am growing beets in the garden, but have never had much success with growing turnips.
Mary – Good for you! I have not tried that one yet. My mom and dad always ate kimchi, but I never liked it. However, I don’t remember ever trying it. 😉 Maybe I would like it now that I am more refined… ha, ha!!!! I am so happy for you that you’re growing some of your own food. I look forward to that day!
Yum! Looks good. You have reminded me that i need to lacto-ferment some of my turnips and beets in my fridge. Thanks!
hi Wardee
i am borrowing a nourishing traditions book from kim t and was looking at the pickled beet recipe. i notice she cooks the beets thouroughly before cutting them up to pickle. i know that raw (and uncultured beets) are not healthful to eat, so im curious in this recipe for turnips with beets, how they are raw and pickled?
are you digesting them fine? are they hard on the teeth?
thanks for the hw order today!
gab
my message reads a little confusedly… what i mean by ‘how are they raw and pickled’ is how do you find them? are they as good as pickled cooked beets?
i hope that makes better sense!
Gabrielle – That’s a good question! I saw both her recipes in the book and one was cooked and one was not. So I figured it was okay never to cook the beets and here’s why it makes sense to me. The process of lacto-fermentation enhances digestibility – wouldn’t that be the same function as cooking, for beets? – but also increases vitamin levels and produces enzymes. I feel like this is a simple answer and possibly too simple, so if you come across anything else, let me know! We are digesting them fine and there’s nothing hard on the teeth. They’re crisp and crunchy, not hard.
Mindy – I think it means a cellar (kept below 45 degrees, but possibly lower to 40 or 35 degrees) or a refrigerator. I don’t think a pantry is cool enough. Perhaps over time you’ll adjust to more salty, sour flavors! We can always hope. 😉
Alyss – Yay! I didn’t follow the recipe you mentioned because of the cooking. Since another recipe didn’t call for cooking, I went the easy way. I’m glad you did, too! Enjoy them!
Wardee – To answer your question, I like pickles…but only sweet pickles! Which obviously poses a bit of a problem these days. 😛 I’m trying to re-train my taste buds, though.
I have a question that keeps coming to mind. These recipes (and in NT too) say “cold storage.” Does that mean the refrigerator? Or just a cool shelf in the pantry?
[rq=12027,0,blog][/rq]a dozen years
You inspired me! I made up a jar of beet and carrot pickles this week with the five little turnips I grew in my garden. It is fizzing away like crazy and ready to go in the fridge this afternoon. The NT recipe says to cook the beets before fermenting but I didn’t want to. Remembering you and your beets made up my mind – slice, but don’t cook! 🙂
Thanks for being here and being awesome!
[rq=12161,0,blog][/rq]I Tempted Her With Pheasant
I pickled some Japanese turnips and some squash today, Wardee. 🙂 Mark saw me getting everything together and made a quick run to the garden to find some radishes too! hahaha!
S
.-= Sylvia´s last blog ..Menu Plan Day =-.
Yay, Sylvia! That is great! I love it that Mark gathered the last bit!
hi Wardee!
i made the n.t. turnips and beets (as well as the cooked beets) and i have to comment that right away my jar was turning quite purple from the beets- not at all like your photos!
anyway, we opened these after about one week and there was considerable gas built up so that it really *popped* when opened. then we opened it again 3-4 days later and wow, a bigger pop.
this makes me nervous… i feel like i need to go and crack open all the other jars of stuff or they will build up gasses and explode! have you noticed the gas build up?
i do like the turnips and beets. we also made the n.t. ginger carrots but dont like them very much. and we made spicy carrots like alyss describes but havent tried those yet.
by the way… i have your grapeleaves in my fridge. if you are going to be in the area, maybe for an ortho appointment? let me know and i will meet you to get them to you (though they can sit in my fridge until i see you next— assuming they dont explode!)
gab
ps- i am storing them all in the fridge because i dont have other cold storage options… i wonder if that makes the gasses worse??
Gabrielle – My photo shows the beets on the first day. After that, they all got quite purple, turnips and water, included! I have noticed gas build up. Since I have had Kombucha explode on me, I am used to cracking open jars periodically, but I haven’t done it for these in the fridge. Maybe I should! Let me know what you find out. Some jars I’ve had in the fridge for 2 months and no explosions yet. I think the fridge slows down the gassing process. 🙂 Thanks for the grape leaves. I’ll be in town this morning, but I think it is probably too short notice to meet you. I’m only going to be around from 9 to 11 and then have to scoot. But A. will have a follow up in a week or two, so let’s meet then.
i probably could have met you this morning as i had to meet another friend on harvard at 930- but i didnt check back here. oh well- let me know about next time!
oh, and i know what you mean- but with mine, they were immediately purple. the turnips had purple drips as i was slicing beets and putting them in the jar and by the time i added the liquid it was totally purple- though definitely darker as they sat.
i had some sourdough starter nearly explode recently… i have my own and another that a friend gave me that i forgot about. i was rearranging my fridge and i set a yogurt container on the counter as i moved stuff around. i heard a hissing noise and thought ‘uh oh, the yogurts going to blow!’ and sure enough the top popped right off before my eyes! thats when i realised it was sourdough in the yogurt container.
also had kombucha explode, so i may go and crack open lids breifly right now…
Why can’t you use the whey leftover from cheesemaking? I have four jars full of it in my fridge and I’m trying to use it. Any ideas?
Cosmo – I read it somewhere, but I can’t remember where it was. But… Meg shared that she learned the hard way not to use cheesemaking whey for anything but soaking beans or adding to smoothies because otherwise it gives the pickled veggies a funky taste. 😉
Ideas… soaking beans, smoothies, a cool drink plain or with herbs/spices added (it is suprisingly good to drink!), salad dressings, watering plants, feeding to animals/pets… let us know what you do!
Left over whey is also great used in bread recipes in the place of water.
Years ago I used whey from kefir cheese making as a hair rinse and also in the bath water. It leaves your hair and skin amazingly soft. I learned about that and so much more about fermentation at this website. http://users.sa.chariot.net.au/~dna/kefirpage.html
At the bottom of the page, you will find links to any kind of ferment.
Horning in on your whey talk here, I have used whey from my cheesemaking to make kraut in the past, and it worked just fine. Granted, I only used enough to jump-start the fermentation and used bottled water for the rest of my liquid. I can imagine that an all-whey brine would get pretty funky as Meg and Wardee note.
Gilbert – thanks for sharing from your voice of experience! What do you think is the max you’d want to use in a quart size jar of pickled veggies, to avoid any funky taste?
I make kifer cheese and it is going well. I wanted to use the whey from this process and thought I had it right. The thing that has my wondering is the jar of whey you show in your video. It is clear and the whey I get after pouring my kifer through the cheesecothe is creamy white. I have used it to make biscuts instead of milk and they were the most tender yet. For this process of picklling should I try to seperate the creamy mix from the clear whey. Or is there something I am doing wrong that I could change? Or should I make the cheese clothe more layers than one to separate more cream to stay with the cheese mix?
I use a cotton cloth rather than cheesecloth. The tighter weave gives clearer whey. Something similar to flour sack towels.
My beets are now in and I have never fermented anything except leftovers left in the fridge too long. LOL. I would like a recipe for lacto-fermented sweet and spicy pickled beet. I don’t even know what kifer is and do not drink milk products as I am a vegan. Can you please send me an email with a recipe? Thank you. Terrie
Terri – Hi! I don’t have a recipe for sweet and spicy pickled beet. I’d suggest you google it – or look for library books on traditional fermentation.
Here’s a bit about kefir: https://traditionalcookingschool.com/2009/06/01/why-kefir/
You can also make water kefir, which starts with a different grain (see Resources for sources). BUT, that doesn’t mean it would have whey to drip out for lacto-fermentation – it is totally different in that respect – I’m only mentioning it because it is a probiotic vegan beverage. 🙂
Since you won’t be able to use whey, you would want to use only salt in your fermentation recipes. However, this won’t work for fruit, just veggies. Have you read the book Nourishing Traditions? I’d suggest reading the chapter on lacto-fermentation – also getting other books from the library. Such as “Wild Fermentation” by Sandor Katz. (I haven’t read that yet, but it is on my list, there is a link on my Resources page.
I have to comment on your peeling-quarting-slicing picture. Where you at my house? It looks like my cutting board, countertop and silver bowl! 😆
.-= Marg´s last blog post… Picking saskatoons =-.
Too funny, Marg! But I believe I was home and I was sitting at the table. 🙂
I am really interested in making lacto-fermented vegetables, but I have so many vegetables to ferment that I can’t fathom having enough space to store them in my fridge. My hope is that I can lacto-ferment the veggies, then heat the jars enough to seal the lids so I can store these jars in my cupboard. Any suggestions?
Kyp – You’ve run into the trouble that we all have in our modern homes that lack old-fashioned food storage options, such as cellars. 🙁 It is sad. There are creative ways to build cellars – just put boxes in the ground, etc. You’d have to do some research to find earth-storage options. There are cellaring books at the library or possibly a google search will yield ideas. We ourselves are trying to figure out a solution to this – and have not decided what type of cellar we will do. If you do the heating, you will kill the bacteria and lose all the benefits of lacto-fermentation. Do you have any cellar-storage options? I’m sorry not to give you a definite answer.
You have to keep them in cold storage correct? How long do they last in cold storage all winter? ie a winter supply?
I am a canner so i am acustomed to heating jars to make them sterile & the fruit and veggies too… Is it neccissary to heat the jars..then let them cool and then fill them?
I think from here on in its Lacto fermented for me, I really don’t like the amount of sugar or vinegar required to can …
Please advise me if i need to heat the jars …. how else do you get the lid to seal ?
I have turnip like crazy (and beets too so this receipe is perfect)
Thanks,
Lisa
Canada
Lisa – LF (lacto-fermented) veggies should last in cold storage for several months to a year. LF fruits should be eaten within two months (according to Nourishing Traditions). You would want to start with clean jars, but I rarely see anyone mention “sterile.” This process of LF encourages the beneficial lactobacilli to proliferate and it suppresses putrefying bacteria. Lids are sealed merely by tightening them; no boiling is necessary. However, it is not the “seal” you would usually find through high-heat canning. Enjoy! I’d recommend the book “Wild Fermentation” by Sandor Katz. Boy, is it wonderful! I am reading it right now and it expounds on the principles in NT to a greater extent.
Oh wow! exactly what i was looking for without having to buy a book!
Id rather spend my money on sun dried sea salt then a book 😛 BTW most people will use salt or sea salt from a store… be careful ive read a few books that state most store sea salt is heat dried to high temperatures. this makes the salt inorganic and dead and collects in the body in bad ways… *shocking truth about water (Salt)
a parallel would be vinegar from your ferment verses white vinegar in the store. alive vs dead.
Anyhow are most vegetables the same? as long as they arent cooked they have the natural bacteria on them waiting to help us?! must be true.
So these recipes are often just a matter of salt/veggie and taste combos?
Im on a raw plant diet and this would compliment it greatly with the veggies i find hard to eat. So thanks 🙂
I started some lacto fermented beets and summer squash yesterday. Yeah! I am also wondering about storage temperature. (I saw the previous post that recommends 40 degrees. I would like to store the jars in my basement which stays 50-55 degrees in the winter. Any experience with this?
I just prepared my first jar of lacto-fermented beets. Can’t wait to try them in 3 days!
Do you know if lacto-fermentation will work with fruit (such as pears)?
.-= Kelly´s last blog post… Get a new replacement SIGG bottle for free =-.
Kelly – Yes, you can lacto-ferment fruits. I have not done any. But in Nourishing Traditions and also Wild Fermentation, there are fruit recipes. I know you must use whey for those recipes, using only salt is not an option. See my Resources Page for links to those books. Enjoy your beets!
Why can’t you use whey from cheesemaking? I’m bummed b/c I just found a source of raw goat whey but it comes from cheesemaking.
Jill – This whole issue is up in the air for me! The other day, I read something that made me think we could use cheesemaking whey. I guess the usual assumption is that cheesemaking whey is “dead” because the cheese has been heated. But what I read suggested that “raw” whey from cheese that has not been heated (like my cheeses don’t usually go over 86 degrees) could be used. So I am willing to give it a try myself. I just decided that the other day. If you try it, please come back and share what your results are! 🙂 P.S. I don’t think I would use the whey from making feta cheese, as the calf lipase added has a very strong flavor that might not go well with fermented veggies. 😉
Hi Wardee,
I have been wanting to try to lacto-ferment veggies, but am a bit confused. Some websites say you have to use a contraption that will allow the bubbling gases to escape, but your method states to tightly cap until ready. Have you ever had a jar explode? I appreciate your input, great stuff here!
Daina – You know, I have tried both and they both work fine. This is not an exact science, it is a traditional skill achieved by many people around the globe in various vessels and kitchen circumstances. I have never had a jar explode, though a friend and I have worried about it. None of my LF veggies have gotten older than 3 months. I have had a Kombucha jar explode, and that was only a week capped. In my opinion, if the LF worked properly, then the balance of good bacteria will protect for spoiling if you risk opening the jar and releasing gases. My sauerkraut is in the fridge in a gallon jar and I take some out, repack it, and let it keep aging. (Now that I made in a jar with the airlock attachment, and I didn’t leave enough room in the top for gases to build up, so it bubbled all over. Then I took some out, reattached the airlock, and it continued developing on its merry way.) I believe there are many scenarios that work for LF foods. Hope this helps – sorry I don’t have a firm answer.
I just started to make Lacto Femented Beets now. I am from Japan and we often use Beets leaves as well. I chopped all the leaves and mix with salt and leave them for a while. I am not sure this is going to work but I think my mom used to do that. Do you use leaves?
Misa – I haven’t used beet leaves, no. But you can lacto-ferment almost anything. I think you should try it! Let me know how it goes.
I think I read somewhere that the leftover kraut juice could be used on the next batch of kraut, so last time I made it, I used my leftover juice. It seemed to “jumpstart” the new batch, instead of water/whey. Also, adjust your amount of salt probably, since the juice would be salty already. BTW, my favorite ferment so far was a cabbage, carrot, and green apple mixture. Yummy!
Lori – I just read that the other day, too! It was in Wild Fermentation by Sandor Katz. I’m really happy to hear you tried it and it worked. I’m going to do it for sure. The cabbage/carrot/green apple sounds delish!
This can be done but isn’t ideal, because in the process of fermentation, a series of good bacteria species will proliferate and then die off, with others succeeding them as the culture matures. If you use brine from an already fermented batch, you are skipping some of the steps, and that’s not necessarily a good thing, from the standpoint of having the best mix of bacterial species develop naturally. It’s seldom necessary to add any culture, except when you do fruits, just because we usually don’t like the taste of salted fruits.
Hi,
Any idea if whey can be frozen then thawed to use in fermentation? My theory is yes since cheese and bread starters can be frozen. But I don’t want to ruin a bunch of whey, so I’m asking….
Thanks,
Nikki
Nikki – Yes, I believe that freezing is fine. Whey will keep for 6 months in the fridge though, too.
Looks great. I’ll have to try it!
.-= Moon over Martinborough´s last blog post… The day the water stopped =-.
To answer your question of what to do with the leftover liquid from lacto-fermented vegetables– drink it. I have become an aficionado of sauer kraut lately and this is what my room mates and I do with the leftover liquid. It aids in digestion, improves immune system function, keeps you regular, and cures a hangover.
Keep the leftover liquid in the jar, and fill it with peeled, boiled eggs. You can add a little dill, garlic or other seasonings if you like. Store in the fridge, and start using the eggs after a couple of days. They are great chopped up into tuna for sandwiches.
Aunt Alice – Great idea! Really great idea. I’m going to do this. Thank you for sharing.
Can you eat the Beets & Turnips right after they are cold, or do they need to
be in cold storage for a week or two?
Heather – You can eat them right away! LF foods get better with age, but are ready to eat anytime after the initial fermentation.
Was very excited to try this, but I ended up with nothing fermenting or growing at all after a week.
I used the 2 TB of salt in 1 c. of water, and 2 med-large beets. This is a TREMENDOUS amount of salt! Is this really the right amount of salt? Has anyone had this formula work without the whey?
karnie – This did happen to me once with carrots. It was winter and cool and I think if there is too much salt, it can inhibit even the good bacteria. Since posting this, I have backed off on the amount of salt I use in all NT lacto-fermentation recipes. The veggies are probably still good – you could drain and rinse them and redo with half the amount of salt. It is worth a try if you think they are still good.
Thanks for the reply, Wardee.
I ended up adding more water (to double it), thereby reducing the salt concentration. I didn’t drain or rinse the beets. I also added a 2 TB of liquid from a jar of store-bought LF ginger carrots (Hawthorne Valley Farm brand), in an attempt to kick-start the fermentation. Lo and behold, 3 days later I had bubbling, and after 5, I had a nice tart kvass. It was still very salty, but adding 2 parts water to 1 part kvass makes a tasty beverage.
I think I prefer making a more concentrated product (using plenty of beets) and just diluting it to drink. Seems like this will allow it to keep longer, as the salt + acid level will be higher. And it will take up less space in my tiny fridge!
Karnie – That’s great! I’m really happy to hear this. I was so hoping it could be redeemed and it looks like you’ve done it!
I’m going to be making these today using only beets, thanks for this recipe! The tip about using the liquid for boiled eggs is superb! My husband loves pickled eggs and I’ve been thinking about a natural way to make them. That reminds me, I could use beet kvass for vinegar in my pickled egg recipe… So many brain kickstarting ideas here!
.-= Kimarie´s last blog post… I Want This Math Software =-.
How does it taste when you use raw beets, do they soften up a bit? I’ve made lacto-fermented beets before, but I cooked them first as suggested in Nourishing Traditions.
Sorry, just saw that you answered this question before on page 1, so please disregard. I never noticed there was a second recipe in Nourishing Traditions using raw beets, I will have to take a look at that section again, thanks!
Tried this recipe last night but I think I had some problem with the whey. Purchased live cultured plain kefir but I am not sure if it drained properly. The liquid in my jars was white, then in the morning most of the white had sunk to the bottom of the jars. Is this right? Can’t wait to check up on it when I get home from work.
Lisa, sometimes some of the milk solids make it through the straining – that’s the white stuff you see. You can strain again through a finer cloth or a few layers of cloth. Keeping them out of the whey will help the whey last longer.
Thank You Wardee
This is my first attempt at fermenting. The white is on the bottom and the veggies are floating towards the top but after day 1 there is some bubbling. I think next time I will leave the straining in the fridge overnight (when I have the room) as it seemed to take a long time. I can’t wait for my new kitchen to be done so I can dive into your cheese recipes! Thank You So Much for your website. It is a blessing.
Lisa – Oh, I hope I didn’t misunderstand your first question. The white came from the whey collection, and your proceeded with creating the veggie ferment? I think it will be fine, but next time if you get white bits in your whey try to strain them out. If you don’t strain them out, your whey won’t store so long in the refrigerator. Let me know how everything goes, cheese included!
Wardee,
Why can’t you use the whey from cheesemaking as stated above for this recipe? I wanted to use my leftover whey from the ecourse soft cheese recipe.
Thanks.
Katie – You can use whey from raw cheesemaking. It might be too strongly flavored for fruit lacto-ferments, but I have used it now for months in ferments like these. I will update the post!
Hey, Wardee. I’m going cherry-picking this weekend and want to lacto-ferment some of my cherries, possibly to make a cherry chutney. I see lots of info on the web about how to lacto-ferment veggies without whey, but I don’t see much about fruit. I can’t have dairy, so I’m looking at using water kefir grains or getting coconut kefir from the grocery store, maybe? But I’m not sure what to do. Any advice?
Sally – That’s a very good question! You have to use whey w/ fruit because of not having salt to suppress the bad guys (putrefying bacteria). If you made or got coconut milk kefir, and dripped out the whey, you can use that for the fruit recipes. A cherry chutney- sounds divine! I think you could use any chutney recipe to learn the ratios of fruit to whey and then just experiment. Be sure to let me know how it goes!
Use the leftover brine in soup stock, even after making eggs. It can also be used as a ‘mother’ for future ferments instead of whey. Also use it anywhere you might use soy sauce. I put a couple of tablespoons on my green salad every day for the salty flavor, vitamins, and symbiotic benefits. Add some ground chile for a tobasco type sauce, or better yet lacto-ferment raw or dried chiles.
Peace be with you, Don
It is so warming to find this community on line. I am pulling beets from my garden and decided to try to ferment the green tops like I do cabbage since there are way too many to eat and just hate freezing if I can avoid it.
The recipe I followed was in Perserving Food Without Freezing or Canning, by Terre Vivante. Like you, I had to guess at the amount of salt to use. I used about a teaspoon to a quart of greens and filled the to 1″ of the top with water. Now I am wondering if I should put some whey in it too. . Im concerned it might not be enought salt but Im trying to cut the salt in my families diet.
I really like the idea of using Whey, I am going to try that with all the fresh beets.
Thanks again for all your posts. As I said, It warms my heart.
How do you make homemade whey?
Kelly – You drip yogurt or kefir (with active cultures) through a cheesecloth. The liquid that drips out is whey. The thickened yogurt or kefir is a soft cheese that’s very good, too! See how Erin makes yogurt cheese in this post:
https://traditionalcookingschool.com/2010/04/28/chocolate-torte-with-citrus-yogurt-cheese/
And I do it like this (scroll down to the kefir cheese part):
https://traditionalcookingschool.com/2009/07/29/probiotic-potato-salad/
You can also just let buttermilk sit on the counter for a day or so and it will separate into white curds and yellowish whey. Check out page 87 in Nourishing Traditions by Sally Fallon. By the way the beet greens while preserved did not taste well. The natural smell of the greens got much stronger and was not appealing. Oh well.
Today I just took summer squash out of by dehydrator. I have so much yellow and zucchini I wanted to preserve it without canning or freezing. It really worked well. Dried very fast and I put many pounds of squash in a tiny ball jar. Ill add it to soups and stews this winter. I am glad to finally find something else to do with summer squash .
I made this with beets & onions only. One of my quart jars has a funky whitish stuff (like mold) on top of it. I scooped & spooned off what I could (no way to get it all out) & tasted some yesterday; I haven’t gotten sick, so I’m thinking it’s ok??? I used salt & whey (from cheese-making, your method – no-heat). I’m wondering about either tossing this one jar, or if I do keep it, to scoop out what I can of the beets/onions to put it in a fresh, clean jar, maybe even making a new batch of liquid for it, to keep any “bad stuff” out? Any thoughts?
Also, the flavor is pretty mild. I have let them sit out for 5-6 days to try & get more flavor.
Thanks for the help! 🙂
Amy, if you skim off the white stuff, everything underneath *should* be fine. Since you tasted it, and it is, you’re doing great. It would be repulsive otherwise. Enjoy! Sometimes I let mine sit out for more than 3 days, so they will finish “cooking”!
I had some lacto-fermented beets I made in the summer of 2013 get a moldy taste that autumn when I packed some for my lunch. I was unwilling to just throw them out, since I really like the recipe (it uses whole allspice and anise stars as a flavoring). So they sat in my fridge for a whole year. This summer when I was cleaning out my fridge, I decided to taste them, and, there was no moldy smell OR taste. I figure the good bacteria must have eaten up or otherwise destroyed the mold that had started to form. Is this possible? Since the food is alive, can it fix itself with enough time?
You could try pickled beet eggs with the liquid. Leave some hardboiled eggs in the pickling liquid for couple days.
You could try pickled beet eggs with the liquid. Leave some hardboiled eggs in the pickling liquid for couple days.
Would this recipe still work if I only used beets? I am trying to enjoy beets- most of the time I feel like they taste like dirt, though! Other recipes I looked at added sugar. We try to follow a nourishing, whole food diet so we avoid white sugar- do you have any ideas for sweetening up the beets? As a child, I ate them pickled and they were sweet. Thanks!
Jessica — You can definitely do it with just beets! For sweetening without sugar, why don’t you roast them first and then pickle them. The roasting will sweeten them up. Otherwise add some natural, unrefined sweetener like Sucanat, Rapadura, maple syrup or palm sugar.
I know this is an old post, but I wanted to add if you do roast your veggies before pickling you’ll need to use whey or another inoculant to start your ferment. Roasting will kill the bacteria on the beets. If you don’t have whey you can use water kefir grains or leftover brine from another finished ferment like sauerkraut.
I know this is an old post, but I wanted to add if you do roast your veggies before pickling you’ll need to use whey or another inoculant to start your ferment. Roasting will kill the bacteria on the beets. If you don’t have whey you can use water kefir grains or leftover brine from another finished ferment like sauerkraut.
I use the juice for a nice kick start for another round of veggies, I rarely use whey as I find it makes the veggies softer, I prefer the crunch. When I use juice from a previous fermentation it goes really quick.
While I was living in Switzerland I actually bought sauerkraut juice just for that, gives a wonderful flavour 🙂
Awesome to hear! I’m reading all the reviews to see who didn’t use whey as I’m goingt to try just using salt and I have enough turnips and beets to make a few batches but not all at once. Have you ever used vegetable fermented juice to make saurkruat?
In reading all these comments about the lacto-fermented juice with whey, it brings to mind something I’ve always wondered; do these veggies ever go bad with whey in them? I just threw out some lacto-fermented ketchup that has been in the fridge since April…just because. It smelled the same but I did not taste it. We just had not used it in so long.
Also, I had some lacto-ferm. mayonnaise in the fridge and after 6 weeks in the fridge, it had mold on top. Once, when I had just a little whey left in my jar, it also grew mold after being in the fridge approx. 2 months. I keep my fridge pretty cold. What are your thoughts? I just made more ketchup and mayo with whey, so how long, on average, should I expect it to last?
Tricia, we just ate some lacto-fermented ketchup tonight that I’ve had since May – I’d made a double batch & this was the last jar of it, and it’s fine. I don’t know if this makes a difference, but I had it stored in my “spare” fridge, one that I don’t get into very often (couple times a week), and use to store my extra lacto-fermented stuff. I’ve had other lacto-fermented stuff not as old seem to go *bad*, but it wasn’t really (see above, one of my previous posts, & Wardee addresses this). I’ve also had various fruits for much longer than you’re really supposed to keep them (I believe Sally Fallon says 2 months in “Nourishing Traditions”), and they just got “stronger” – in fact, I added a bit of some lacto-fermented mixed fruit/coconut/spice mix to my oatmeal this a.m., then added a tsp of Rapadura to off-set the strong fermented flavor. I think I recall Wardee and/or Sally saying that it would be very obvious if something has gone bad, that the taste would be unpalatable. I also think that some things seem to get better with age. I noticed that recently with my LF Ginger Ale. Hope that is some help, Tricia.
Thanks Amy.
So sometimes you can just skim the mold off of the top? I guess like I do with cheese that I’ve forgotten about 🙂
Yum!!! I’ve been wanting to make that ginger ale. We LOVE ginger.
I’m trying these pickled beets this morning. Someone had posted to re-use the leftover lacto-beet juice for boiled eggs. What a childhood memory. We ate those all the time and they were pretty beautiful. Only, I think I didn’t appreciate them then.
I would not just skim the mold off the top. You can cut mold off of hard cheeses but it isn’t safe for soft foods. Even though you can only see fuzzy mold you on the surface, the mycelium (roots) and the toxins can spread invisibly through soft foods. Some molds produce carcinogenic toxins. Its just a bad idea and not worth the risk IMO.
Mold is tolerant of acids and salts (obviously) but one thing you can do to prevent mold grown is to seal your food tightly. Mold requires oxygen so sealing food tightly will reduce the opportunity for mold growth.
I should clarify that I’m referring to mold growing on the food itself, not on the surface of the water. It IS safe to skim mold off the surface of the water as long as the food is clearly below the water line. I don’t know what post you are replying so I’m not sure so I just wanted to add my 2 cents just in case 🙂
I have been using Fido jars for months now, (Leah Harris at Nourishing Treasures has done many experiments with microscopes, counting labs and checking on mold) and have never had anything at all grow on my ferments! The seal holds in enough CO2 and lets the extra gas out – while keepin the oxygen out. No need to ever open and burp, no need for any special airlocks.
Dear Wardee!
First of all, i would like to say thank you for your blog. Here we can read very interesting informations. I would have a question for you, if possible.
Will the fermentation works, if i use mineral water instead of pure water? Is the RO or destilled water great too? Sorry for my bad english… ^^
Best regards,
Yumm
Yumm — I just wouldn’t use chlorinated water or city water. The best choice would be clean well water or mineral water or RO water (perhaps with minerals restored through mineral drops).
Wardee,
My grandma used to pickle beetroot once a year in quite a substantial quantity. The juice we used to make cold beetroot soup: take one onion (whole), one carrot and a few potatoes (cut into pieces). Cook them till soft, add grated pickled beetroot and juice from pickling to your taste. Cool, add sour cream before serving. Enjoy!
I recently fermented beets and turnips using home-made whey and a little salt. Our house was a little colder than ideal (generally cooler than 67 degrees at night). I was waiting for the metal lid on the canning jar to suck all the way down, thinking that’s when the concoction would be ready. It wasn’t happening, so after a week or so, I opened the jar. There was lots of fizzing. So are the beets ok after sitting out on the counter that long? I refrigerated them right after opening.
Brenda — I know it has been a long time. I’m sorry for missing your question!
The fizzing is a good sign — that’s what the organisms give off after feasting on the foods. A week is a good amount of time for solid veggies, like beets, turnips, green beans, cabbage. The softer or more mashed up the food is, the less time.
Vegetables that are only fermented for a week or two do NOT have all the lactose fermenting benefits. Our ancestors fermented them for several month to get the benefits. I usually ferment Sauerkraut and other veggies at a minimum for 12 weeks before opening the air lock ( I use specific fermenting stoneware crocks) Any fermenting goes in 2 steps, A fast initial ferment for the first week or so, then put them into cool storage were they will undergo the second ferment starting after about 4 weeks. This is a very slow process and ends up eating up the salt and producing vitamin C. This process slows down considerably after about 10-12 weeks. Vegetables fermented this way will last for 6-8 month in the fridge or in cold storage (~50F). They can also be hot canned after fermenting in a pressure caner to last years…although some of the nutritional benefits are lost through heating. My grandparents and mother used to ferment lots of vegetables in fall…and we ate it all winter / spring until the next growing season. When I grew up, supermarkets did not had fresh vegetables all year long even in the winter and so it was of uttermost importance to ferment, can, and dry fruits and vegetables and dry and smoke our meat. Our “refrigerator” was a root cellar cut into a sand stone ridge that kept the temperatures inside at ~50F all year long. Short ferments are great for people that don’t want to wait ( and lose benefits) or who “fiddle with it as a novelty….but as effective food storage or to get the maximum benefits from it, long ferments and consequent cold storage is the way to go.
I had a question. The jar will not explode due to pressure of the fermenting process if the lid if on tight? Am new at this and am reading on some sites to leave lid loose and others to lid on tightly. Thanks
Orrilia — It could explode if left too long. I usually burp my jars every day or so to prevent this. Whether or not to lid is up to you. I prefer to lid tightly to so that my ferment isn’t exposed to the organisms in the air any more than it needs to be. You might want to look at the fermentation jars from Cultures for Health. I have a couple. They allow air out, but not in. So no explosions and no burping but protection from the organisms in the air.
We have a new product that uses regular canning jar that we fit with a plastic cover and fermentation lock.
http:/tinyurl.com/PicklePerfect
Use fermenting crocks or lids with a water airlock..this will prevent mold and other contamination that can happen by opening the jar to vent.
If you make lacto fermented sauerkraut (or other veggie) can you store them in vacuum storage bags (like using a food saver) once the sauerkraut is finished in the crock? Once vacuumed bagged, would it be shelf stable, or would you need to store in the refrigerator or freezer? Just wondering as I thought this would be great way to store it w/o having to heat it like canning. Also, you can purchase the things for the food saver that vacuum seals jars, would this work to make it shelf stable? Just wondering as I saw on Cultures for Health that the are selling raw lacto-fermented veggies that are vacuum sealed in bags and wondered if this would work for the home kitchen. I have a lot more room to store it in cabinets than in my refrigerator.
Susan — I wouldn’t recommend a vaccuum storage bag at room temperature. The organisms in the ferment don’t need oxygen to keep working and they’ll continue to do so — probably ruining the texture of the fermentation (turning it to mush) and exploding the bag because of the built up pressure. The point of moving to the fridge or freezer is to slow the fermentation to such a point that the food is pretty stable.
You can use the bags in the fridge or freezer. Or in cold storage cellar. But not room temperature.
Sorry about my delay in answering this!
Great question! I’m looking forward to learning the answer too.
I know you’re supposed to use filtered water but I’ve used regular tap water and it’s worked fine. I’m sure it’s better the other way but ya do what you can do right? Well I recently moved into a new house that has soft water. Do you know if it will still work using that or will that completely alter the outcome? Please let me know if you or anyone has info regarding this.
Also if I add juice from a previous batch of LF spicy carrots do you know specifically how much less salt to use? Don’t know if there’s a science here or if someone has tried it and can share what they did. I made just a couple of jars using the juice vs. whey and will see if I guessed right for the salt this time. Thank you!
Belinda — The soft water is probably okay, though I’m not sure. On using the whey from another batch, I’m not sure I would reduce the salt much at all, maybe a 1/2 teaspoon or so? I’d more do it to taste. Sorry, I don’t have an exact answer — I’m not sure there is one.
Right now I only have turnips. I presume that would be OK to go ahead without the beets?? Barbara
Yes! I do that often. 🙂
I usually pickle, but I’m going to try this method this time!
I’m wondering though….with so much fermentation going on in the same place – I have been making yogurt, keeping a sourdough starter, and reproducing sour cream (also considering to try kefir soon)…. can the little critters end up migrating around in my kitchen and beguin contaminating the other fermenting processes?
I’ve been wondering the same thing. I have a batch of Apple Cider Vinegar, Kombucha, Sauerkraut and Kimchi all going right now.
I am still learning these things myself, but my daughter has read that there should be some separation between the various types of things we ferment, as much as 20 feet or so (I think that’s the distance she told me). You could probably search for more specifics.
Hi again!
I tried the beets last night. When I opened the jar it was like red champagne! I think that table cloth has seen it´s last dinner.
The texture is great – not like raw but still crunchy. The taste is ok too, but my husband would prefer them more acidic. Can I add some vinegar next time or will that stop the fermentation? Or perhaps if I leave it to mature longer ? I left this jar for 1 week.
Sandra — More time will improve them. You can leave them out longer, or they’ll continue to age in cool storage too. 🙂 Sorry about your tablecloth!
Thanks so much for your blog. I come back often when looking for new projects in my kitchen. You asked what could be done with the juice that is leftover and I have come up with a few things. I use it to make salad dressings, its a salty sour taste that replaces regular vinegar. I use it to start new ferments. The cultures are already active so it speeds up the process. And the other night I made a soup that wasnt very salty (according to my 9 year old!) So instead of the salt shaker I grabbed the ferment liquid jar and added a few tsp. to the soup! It also helped to cool it down as well!
I have a brand new product which is very useful in lacto fermented vegetables made in a jar.
They are weights made of glass that fit into the top of the canning jar that help hold the veggies under the brine solution.
I have them listed on Ebay, just search for ‘lacto ferment glass jar weights’.
Great post – gonna go ferment some beets now!
I’ve been fermenting a lot of things lately and I’ve started to use the leftover brine in my homemade stocks (along with leftover whey from cheesemaking). They’ve made some of the best stocks I’ve created so far!
Enjoy!
Nicole
What is the stock you have made and what is it used in/for?
This is interesting! I’m working on trying to acquire a taste for beets and so have been looking for different ways to prepare them. I love most pickled things, so I think I’ll have to give this a try. Lacto-fermentation is interesting! I think I’ll have to read more about it. I bet you could lacto-ferment bread, could you not? Or is that the same as sourdough? Hmm… I’ll have to do a bit more research. Anyway, thanks for the recipe! I’ll stick it on my list of things to try.
Not just beets but about anything can be fermentated. carrots, cukes, zukes, beans, crooked neck squash, tomatoes, brocolli, tormatillos, rubarb, and garlic are what I have done, all with good results
Richard, You had me at garlic. I have GOT to try this soon!
I have a few ideas about what to do with the left over pickling liquid. I use a few tablespoons to wash down my supplements instead of water or juice. I figure the probiotics are helping digest and utilize them better, just like an enzyme capsule would. I have severe digestive disorders, and I think since I’ve been doing this the last few weeks my digestion has improved. I’m also going to try incorporating the juice into hummus, baba ganouj, and just about any dip that won’t be heated, thus destroying the beneficial enzymes and bacteria. I’ve dehydrated a ton of veggies from my garden, and I’m going to try rehydrating them using the fermented juice. I could grind the dehydrated tomatoes, zucchini, and cucumbers to a powder, then add the juice, and use the mixture in a dip or salad dressing. I haven’t tried it yet, but I think it will work. You can also use the fermented juice in place of vinegar in any recipe.
Hi there,
Why not use the strains of bacteria already happy fermenting vegetable pickles?
Almost all of the top hit sites on the web dealing with lacto-fermentation advise adding whey, I suppose as a kind of guarantee. But none that I’ve read say the obvious, which is that if you already have any kind of pickle naturally fermenting (saurkraut, kimchee, dills, lemons, whatever) you can filch a tablespoon or so of liquid from that and add to the new batch as a natural starter. I have never used whey and have made every pickle you can imagine over the years with no failures, and usually with just salt and water. But I do like to boast my beets with this starter.
Cheers!
Jack
Jack — Yes! If you have leftover juice from another ferment, it is a great kick-start. I agree! Many people don’t have this though, and whey works too.
Can anyone tell me how long whey will keep refrigerated without losing its bacterial kick? And is the amount of whey used for fermentation important? I had a massive bowl of greens and it seemed the specified amount of whey wasn’t going to be enough so I threw in more….any problems with using too much or too little? Thanks for all your work here!
True, for first timers. But once you start your first batch, you always have a few teaspoons of starter around. If you think you need it. To me it’s like taking an aspirin before you have an ache. Just as with naturally started sourdough starter (see the Tartine bread book for a great example of how that, which is a form of lacto pickle too), which has always worked without whey because the same yeasts and bacteria are already present in the air, on hands, in flour, etc., I feel that whey, which is a dairy product, is less natural, and is certainly less traditional, than the ordinary “bloom” on most vegetables that can and does start the pickling process just fine on its own (unless you’ve dipped your vegies in sterilizing solution!). I have never used whey and I have always had a natural start without complication when starting from scratch, since the first batch of pickles I made 40 years ago. Grandma’s and grandpas my age and older pretty much agree, I bet. Though they may exist, I’ve never seen a pre 1960 pickle recipe that called for whey, either. What did pioneers, farmers, and urban picklers do for centuries? They relied on, and still do in many places in the world, natural, reliable, bloom started fermentation.
I posted the above in response to Wardee’s response to me. Didn’t know it would read as a response to Mary.
To Mary I’d say this: Whey, which has proteins in it (complicated molecules that can break down into all sorts of stuff), has a shelf life, I’ve heard, of “up to six months” but I don’t trust the “up to” because it can become when molds and other organisms start to take over (ever see a nicely planted terrarium after a few months?). Yet naturally started pickle juice can go on and on, especially when “cloned” container to container like wine lees or mother of vinegar is, because it is preserved by the very organisms that make it. I have reused the juice from pickled lemons over and over and have heard of some excellent pickled lemons that were over ten years old. The ancient Chinese new about really really (like 100-year-old) old pickle. I say, don’t worry about this new-fangled whey guarantee, and do what picklers have done since pickling began, use the pickle juice that keeps and keeps giving, especially in a fridge or root cellar or other cool environment.
You ask, “… what do I do with the liquid leftover from this natural pickling? I hate to throw it away because I’m certain it is filled with tons of good bacteria. I think it could be used in salad dressings and dips. Anyone have tips for me?”
My grandmother, from eastern Europe, had two large crocks under her kitchen sink, one for pickles and one for borscht. My father called them her “magic barrels.” She kept putting cucumbers in and taking pickles out, putting beets and water in and taking borscht out. He never knew her secret so I never did either. I think I have found it in your fermentation method. I will know better in a few months.
Jack — That is such a cool story. Thanks for sharing! I am glad you out how her magic worked!
I’m glad you like it. There is more to the story. My father knew the difference between a barrel and a crock, of course. Why did he call them my grandmother’s “magic barrels”? My grandparents once had a live poultry market in downtown Denver. Apart from the poultry, they sold other things, including pickles and borscht. It mystified my father that the fresh vegetables turned into pickles and borscht as if by magic. At that scale, she had them in actual barrels and it was then that he called them her “magic barrels.” When they got rid of the poultry market, she downsized it to crocks but my father was already used to referring to “Grandma’s magic barrels.” I will let you know in a few weeks if reusing the water for new cucumbers works.
Thank you for posting about natural fermentation. I have been gleaning all of the information I can about it and was looking for a good recipe for beets. I love pickled beets but this would be much better fermented naturally.
I am in the process of my second batch of Kombucha using the scoby. I was wondering if I could use some of the liquid off the top to add to my vegetables for fermentation?
thanks!
Cherri
I have used Kombucha for quick refrigerated pickles and salad dressings instead of vinegar. I wouldn’t use it to help lacto-ferment or top off your jars because it is a different kind of ferment. It may be because Kombucha is more like a vinegar ferment and could harm your lacto-bacteria. Many fermenters warn against mixing different kinds of ferments as it many affect the results adversely.
PS using the liquid in lacto fermented veggies is easy. I drink a shot of it every time I take some veggies out. Leave enough to cover the veggies and saving some for the next batch. That liquid is full of good probiotics. In older times, the veggies were often used in cooking and just the juice was taken for digestion and good health:)
I swallow about 1/4 cup each day to wash down my supplements. You could also use it as a base for green, savory smoothies, or use it in place of vinegar in salads and dips. I also use it in place of water to mix with my powdered green drink, and it tastes delicious.
I recently found out that fermented beet juice lowers blood pressure.Where can I get raw whey and
how much should I use if I’m using 3 large beets?
Hi Wardee,
Love the website which disseminates an enormous amount of quality information in these difficult and generally “unhealthy” times.
Thanks for the interesting post. Yes I’m sure that it is full of “Beneficial Life”.
May be the “juice” should/could be utilised instead of Sole if the salt used is Himalayan salt.
I would suggest that such a highly mineralised salt solution & beneficial Bacteria & Enzymes, may form a symbiotic relationship and complement one-another’s benefits.
One – presumably – would have to judge how much is drunk per day as, possibly, even this salt may not be beneficial in excess doses.
I have included a link on the benefits of sole as reference.
http://himalayansalt.com.au/himalayan-salt-health/health-benefits-drinking-sole
I agree that dumping it seems a waste.
Hola!
I’m not clear wheter I need to fill up the jar or just use the One cup of water, either if it doesnt cover de vegetables. I would apreciate any help!!
Saludos!!
Rafa
Rafa — Use the 1 cup of water (with salt mixed into it). Then if the jar needs more liquid, add more water.
Thank you!
If you have your vegetables squished into the jar, there will be very little space for the liquid to fill up. Most times, a quart of brine will be enough to make 3 or 4 quart jars of ferments.
Thank you for all the helpful information. I attempted to make my first batch of beets yesterday and just realized I somehow managed to double the amount of salt in the brine. Am I better off draining out the brine now and restarting or should I simply expect that this first batch will be ruined? any suggestions is appreciated. thanks again!
Jocko — You could pour off some of the brine and replace with water. That will dilute the salt. Or they might just be okay!
The beets will ferment just fine, they’ll just taste too salty. I would divide up each jar into two jars so they’re only half full, then mix in another vegetable such as cabbage, carrots, kale, squash, or more beets to within an inch or two of the top of the jar. The culture in the fermenting beets will also culture the fresh vegetables you add. Let them sit out at room temperature two or three days, then refrigerate. It’s the same concept as making kefir or yogurt, where you mix some of the old culture with fresh product, then leave it out for a few days for the good bacteria to proliferate. Or you could pour out the beet juice into clean jars, add fresh vegetables, and leave out to ferment. The beet juice will contain enough good bacteria to act as a culture starter. Then eat the fermented beets, but if they’re too salty you can dilute them in salad or with other vegetables. I find that most fermented veggies are too salty on their own, but are great combined with other foods.
Thanks for the ideas and suggestions! I am a newbie but am definitely excited about making living, healthy food. I’m sure I’ll make mistakes but that is part of the fun and experience. BTW – I am using the Perfect Pickler – has anyone had any experience using this tool? It seems easy enough but am now considering moving toward stone crock fermentation for the more authentic process.
Great information here, first time visiting this site.
Someone was concerned about the tight jar lids possibly causing the jar to explode. I understand isconcern, as I also considered that possibility when reading your post. (although its unlikely enough co2 would form from such a low sugar content source of fermentation to make these jars burst…)
As a home brewer/wine/mead maker, I use whats called an “airlock” to release the fermentation pressure from the fermentor vessel. It allowed pressure to escape, while keeping outside air from entering the container.
You could easily retrofit a canning jar top to accept an airlock if your handy with tools. You’d have to punch a hole in the canning lid large enough for a small rubber stopper that will accept the airlock.
Here is an alternative I found online (no affiliation)
http://www.farmcurious.com/how-to-turn-a-mason-jar-into-a-fermenting-crock/
that is a neat little device, however you can also find a rubber stopper that will fit the standard mouth jars at home brew supply stores on line.
A #13 drilled stopper is the correct size to fit the standard mouth canning jar. Apparently none available for the wide mouth jars (yet).
Drilled means there is a hole in the center of the stopper for an airlock to be inserted into. The airlock is best filled with cheap vodka and the vodka acts as a barrier to keep outside air from entering your fermentation container.
Most of my home brewer friends use bleach in their airlocks as a barrier, however I prefer to drink vodka over bleach in the possible event of a leakage into my goods!
Hope this helps!
http://store.homebrewheaven.com/rubber-stoppers-p654.aspx (just an example of sources for drilled stoppers and airlocks)
I’ve a home made vacuum chamber to vac-seal jars up to gallon. It will pull 25″ Hg. Just wondering if anyone has tried or knows anyone who has tried such to store fermented food long term. Also wondering if there’s anything one can use as a fermentation arrestor besides refrigeration.
I would love to know the answer to the storage question too! I want to ferment lots of good, local produce to get me through next winter but I know my current fridge won’t cut it.
I’ve been using the brine from my fermented veggies to spice up my deviled eggs without adding chunks of pickle relish. So delicious!
Thank you for sharing! This recipe actually inspired me to start 2 big mason jars of beets (lids slightly ajar with dust cover). That was on 5/30/13… now (as of June 25th) they taste right but they’re still pretty firm. They’ve been in the dark in my basement which is probably around 70 degrees. I sliced them maybe a tiny bit more than a mm thick in various shapes the size of pennies or nickles. Should I just give up and eat them now since they still taste alright or should I let them keep going? I’m ok with a sour pickle taste and would really prefer a softer texture if you think that’s possible by letting them go longer. Or do I run the risk of them going bad in some other way? There’s no mold to be seen and I haven’t had any of my many ferments go moldy yet, knock on wood! Thanks for any insight you may have!
Shannon — I’d suggest letting them go longer. Beets are firm and can take weeks to months to soften up. The thicker cuts especially take longer to ferment. If all looks well, there’s no need to worry, just keep them going. If you notice any signs of mold, skim and move to cold storage. They’ll continue to ferment there, just not so quickly.
Alright, that was my gut instinct. Thank you so much for taking the time to comment on an old post!
The liquid? I just drink it; full of probiotics and very refreshing, just like sauerkraut juice.
I just got turnips in my CSA box, so I wanted to find a fermentation recipe. Thanks!
And I usually have my kids drink swigs of the brine if they’ve had too much sugar. We were just on a trip this weekend where they got too much sugar and we were driving home without being able to brush our teeth. So we all passed around the Bubbies pickle jar and drank a few swigs and swished it around in our mouths. Not sure how well that works, but it makes me feel better! =) Thanks for all you do for health!
long shot that someone will respond, but I just made the lactofermented beets and after 4 days they have a foam on top. I’m wondering if that is okay or is it ruined. It smells fine. There was one little spot that I scraped off. I’ve put it in the fridge now. thanks for getting back to me :).
Couldn’t you use the left over juice from the beets to make more beets? Save the brine and add more vegetables. I am trying these today with only beets and fresh cinnamon, fresh ginger, and fresh nutmeg. I hope they are good. I made some sauerkraut too.
I loved making these and can hardly wait to taste them!
Does anyone have any thoughts as to whether peeling beets for fermentation is a matter of preference, or if it’s actually an important step that should never be skipped?
Lacto-fermented pickle juice makes a great wake-up drink in the morning! It’s good for the adrenals to start out with something salty in the morning, according to the Bulletproof Executive, if I remember correctly. Anyway, it’s delicious and probiotic.
Hi, I roasted my golden beets yesterday and then peeled and sliced them. When I then realized we needed more jar tops, so I put them in the fridge until today. But, they’ve all oxidized and turned black! Should I toss them out to the pigs and start again? Or can I still ferment them? If I put them right in the brine after slicing, will that avoid them oxidizing?
Thanks!
After three days, do you transfer the beets and turnips from the culturing jar into another jar for storage with the brine, or without the brine?
Hi Allison,
You transfer the whole jar, brine, beets, and turnips to cold storage. 🙂
~Danielle, TCS Customer Success Team
Thanks for explaining that fermentation inhibits the growth of bacteria until enough lactic acid is produced to preserve the veggies for months. My husband and I want to start being more adventurous with the healthy foods we eat to try and make it fun. I’m glad I read your article because it was fun to learn about fermentation and the benefits of using fermented juice.
I love beets it contain a lot of beneficial vitamins. Your article has been enlightening and fun to read and I am grateful so thank you for sharing.
Impressive! Thanks for the post
Lovely recipe